 Rise from Articulate
 and
Elearis from Curator Solutions are two similar web-based responsive eLearning authoring tools.
We'll compare the workflow and results of both tools, and you'll learn which best suits your needs. Feel free to read ahead, or use the following links to skip to a section.
1. How easy is it to start a course?
Both tools have similar interfaces when creating a new course.
However, as you'll notice in the images below, Elearis has a lot more options. Many of these are intended for university/college type courses. Course reference number, for example, institution and school name, or the ability to include the course in a program.
This is the Rise course creation dialogue.
Next is the Elearis dialogue.
Rise gives you three inputs: course title, course description, and course sections (inside which you create lessons).
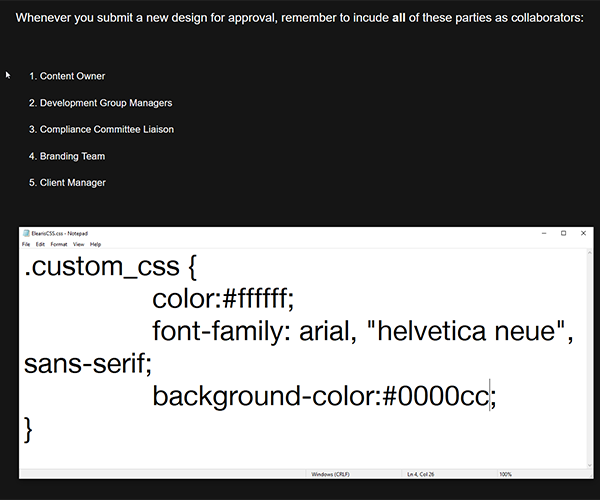
Meanwhile, Elearis gives the aforementioned university-oriented choices, plus the ability to set a course thumbnail and custom stylesheet.
Note that Elearis allows the creation of lessons within a course, and Rise lets you add a thumbnail, but in different parts of their interfaces.
Custom CSS is not something you can easily add in Rise; this feature in Elearis gives you slightly more power to change your course's look.
Both Elearis and Rise allow you to duplicate courses. Hence, you can create course templates and minimize retreading familiar ground when authoring similar courses.
2. Course Settings & Themes
After making your course, you can begin customizing its look and feel. If you want to skip to where I cover content creation, though, just
click here.
Elearis and Rise have different capabilities in the course settings area. Elearis gives you more freedom to change color schemes, while Rise is simpler in that area.
Rise, on the other hand, lets you modify the course's navigation, add translations, and change button labels.
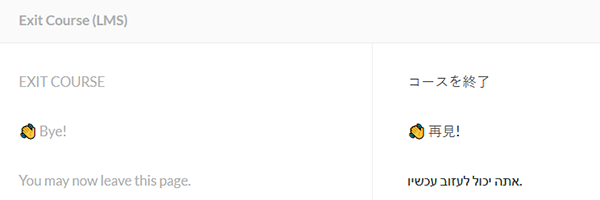
Just about any button label that appears in a Rise course is customizable. Further, these labels are stored as Unicode strings. This means that you can use any alphabet, or even emojis, as you'll see below.
The left side shows the default value, and the right is your custom label.
Rise's translation option allows you to export all of the text from a course to XLIFF. From there, you can load the XLIFF into a computer-assisted translation (CAT) program. This allows your team to localize every text string in the course to another language without having to individually open up pages, lessons, and settings menus.
Back to the colors, however, Rise only gives you a few options.
The image above shows that you can change three things: title font, body font, and accent color. Accent color affects links and buttons.
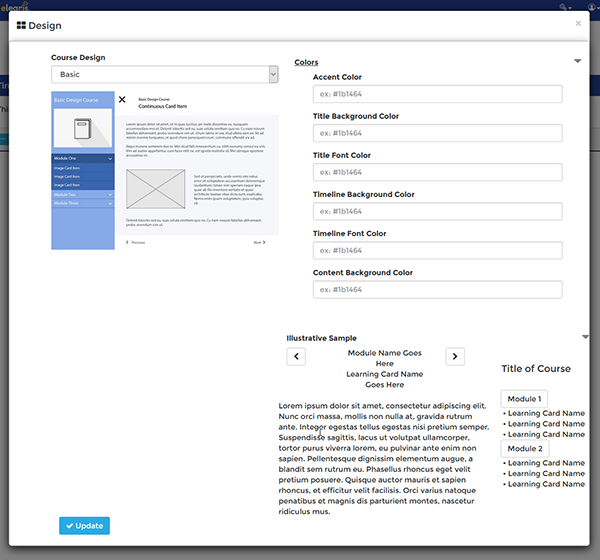
Elearis' Design menu lets you change more things, including both background and font colors of many elements. You may notice that an option to change the color of the course's main body font is missing.
Still, there are two ways to do this from outside of the Design menu.
You can do this by changing text in every block element in the course, the same way you must do it in Rise. This is, of couse, laborious and error-prone.
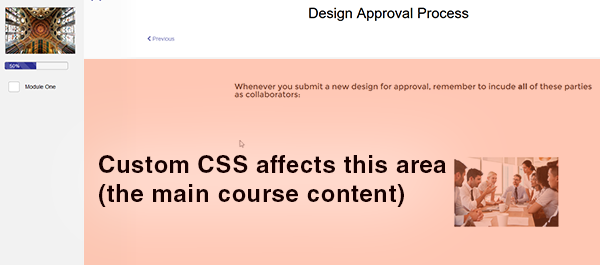
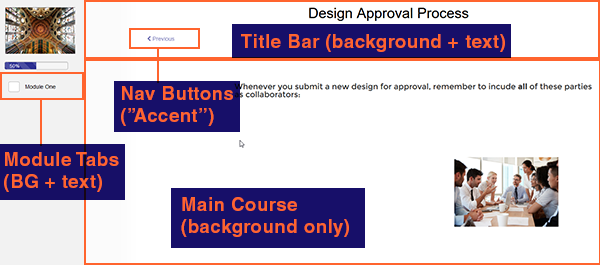
But in Elearis, I mentioned earlier that you can also upload a custom CSS stylesheet.
This only affects the main content area, and not the navigation elements. Even so, you can customize more areas of the sidebar and header than in Rise (see below).
As I mentioned earlier, you can add a cover photo in Rise. Note that this functions as not only the course thumbnail, but as the background image for the course index.
You'll find these options in Course Settings; here, you can also add your company logo.
Make sure to use a large enough cover photo for fullscreen display. On the course index, your cover photo will appear at full browser width.
3. How fast is development?
Once you have created modules (in Elearis) or sections and lessions (in Rise), you can start adding content.
Because they are both responsive-based, Rise and Elearis focus on ensuring content will be readable on both mobile and desktop. Rise is entirely block-based, meaning lessons are like single columns with many rows.
Each block is one row, and contains the content type of your choosing.
Elearis uses "cards," which are like mini-pages.
The Page Builder card works very similar to Rise's block system, allowing you to add rows of text, images, audio, video, and so on. You can also add individual text element cards, image cards, video cards, et cetera, which display one piece of content each.
Both tools have oddities which I found slowed development.
For example, compared to Elearis, Rise is extremely finicky when rearranging courses, as I show in the video above. Dragging oftentimes places the lesson somewhere other than where you tried to drop it. At other times, trying to drag lessons will simply navigate off the page (hence the gray screen at the end of the video above). Although you won't have to do this too often, it can be quite frustrating if you have a lot of lessons.
Rise autosaves your lessons while you work on them, whereas in Elearis, you need to remember to save your work often. Generally, you'll want autosave, but either approach can be desirable, depending on your preferences. While autosave can redeem you if you close your browser without saving, you'd be in trouble if you made changes you didn't mean to make.
In general, adding content and editing block elements seems to be faster in Rise, with fewer loading pauses in between.
You can duplicate blocks in Rise, while no similar functionality exists in Elearis as of this article's writing. If you have a lot of similar parts in your lesson, this is a big time saver.
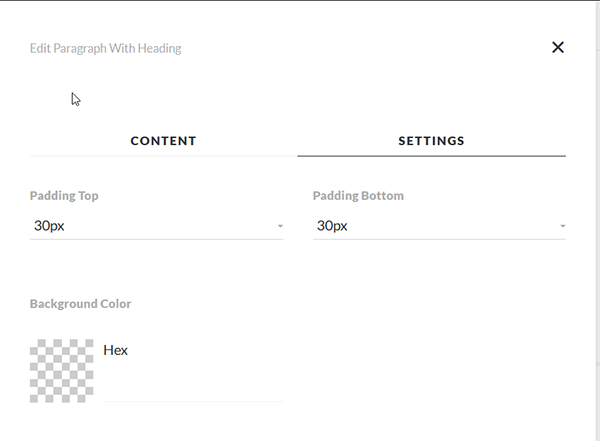
Though, as mentioned earlier, there's no way to change content colors in Rise's course settings, you can change it for individual blocks. Both text and background color can be changed here.
But what if you need to change the color of the whole course after you finish? This entails going through and changing potentially hundreds of block elements individually.
By comparison, in Elearis, a similar color change could be accomplished coursewide with two entries in a custom .css file!
One part of Elearis that can slow development is related to web caching. Changes you've made, including updated images, stylesheets, and card content, oftentimes don't show up right away in Preview.
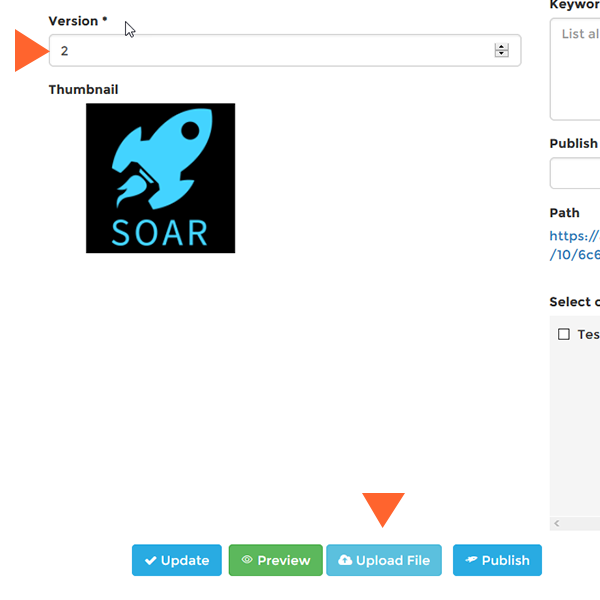
But this leads us to Elearis' Curator integration, which can make development much more efficient. The aforementioned caching issue only applies to content uploaded directly to Elearis. For many of these content types, you also have the option to upload a file to Curator and embed it into your Elearis course.
This means that, for example, if you need to use the same image or video in multiple spots in your course, they can all link to the same Curator resource. Therefore, your students don't need to download the same file multiple times, and you can take advantage of Curator's version control.
If, say, you have the same client logo 29 times across 8 sections, and the client updates their logo, you can just add it as a new version in Curator. Without needing to go back and edit the image in each and every card in your course, you can simply republish it with the new logo.
Here is a summary of the development pros and cons I've just detailed:
Articulate Rise
Pros:
- Quick editor with few loading delays
- Autosave reduces risk of losing work
- Able to duplicate blocks
Articulate Rise Cons:
- Block element colors and styles are only set per block
- Rearranging lessons is glitchy
Elearis
Pros:
- Custom CSS makes design customization efficient
- Curator CMS integration allows media version control
- Manual saving prevents accidentally committing changes
Elearis Cons:
- Editor tends to lag when adding cards and block elements or saving
- Can't duplicate cards or blocks
Both tools allow you to insert a wide range of content, but are limited in the amount of custom navigation you can insert. Neither has the ability to create branching paths within the course.
In both Elearis and Rise, you do have the ability to embed traditional eLearning courses published to HTML5.
Elearis allows you to embed any HTML5 package, meaning it's more versatile in that respect; Rise only allows Storyline courses. Still, Rise's integration with these Storyline courses is deeper, allowing you to choose a Storyline block to use for the course's tracking. Of course, this option may be of limited use,since all tracking will derive from an embedded Storyline piece on one page of the course.
Rise integrates with Storyline courses via their cloud-based Review 360 service, meaning you upload the Storyline piece to your Articulate account and link it from there.
4. What does each tool track?
Before we look at how Elearis and Rise can track learner performance, let's see what eLearning standards each supports. They're similar in this respect, as you'll see below.
Rise:
- SCORM 1.2
- SCORM 2004 (editions 2, 3 & 4)
- AICC
- xAPI
Elearis:
- SCORM 1.2
- SCORM 2004
- AICC
- xAPI
- xAPI (cmi5)
I tested tracking using SCORMCloud and SCORM 1.2 for this article, because it's such a common standard. Both Rise and Elearis can track based on completion. If the learner sees 100% of the content, they'll get a 100% score.
Rise has two additional ways to track: based on course quizzes, and based on a specific embedded Storyline course.
Quiz-based tracking will show you the learner's final score, and allow you to see how many times they got each question wrong before getting it right.
Overall, Rise is more robust in terms of tracking, so if this is a major selling point for you, Rise would be the better choice.
5. Conclusion
With these two responsive eLearning tools, you can achieve similar results.
Rise's superior tracking options help if you need to include a lot of quiz and assessment content. Its quicker workflow can translate to faster turnaround times, and its more thorough documentation may help you learn it faster.
However, Elearis' ability to embed any kind of HTML5 content, even external webpages, adds versatility. Meanwhile, the ability to use CSS to more efficiently brand content can speed up workflow, making rebranding and re-theming large courses much more feasible.
We've created a sample course using both tools; please check them out! For the most part, the courses are very similar, but different capabilities and limitations resulted in a few differences, visually.
Elearis Course: 5 Secrets of Storytelling in eLearning
Rise Course: 5 Secrets of Storytelling in eLearning


 Sometimes, you'll want to remove a part of the audio clip, but you want the time it occupies to remain. A cough or breath, for example, may need to be removed, but you find that simply deleting it makes the sentence sound awkward.
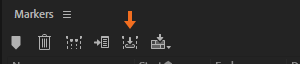
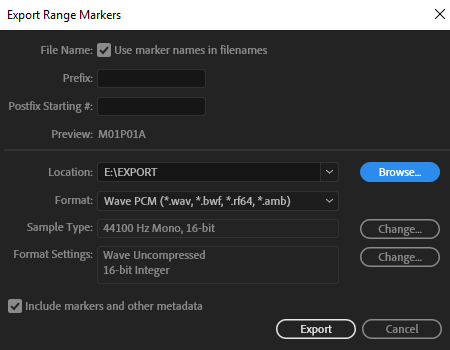
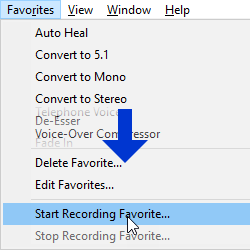
 to export them. It's the fifth from the left in the upper left of the Markers panel, which I have pointed out with an arrow below. A dialog will come up, and there are a few options here.