This post is the second in my series of blog posts on authoring system findings. My first post dealt with various issues encountered while publishing to an LMS using Articulate Storyline 360. This time, we will look at Adobe Captivate 2017.
The following are findings on publishing in Adobe Captivate and text entry in HTML5.
1. Publishing in Adobe Captivate 2017: Choose One Output Format
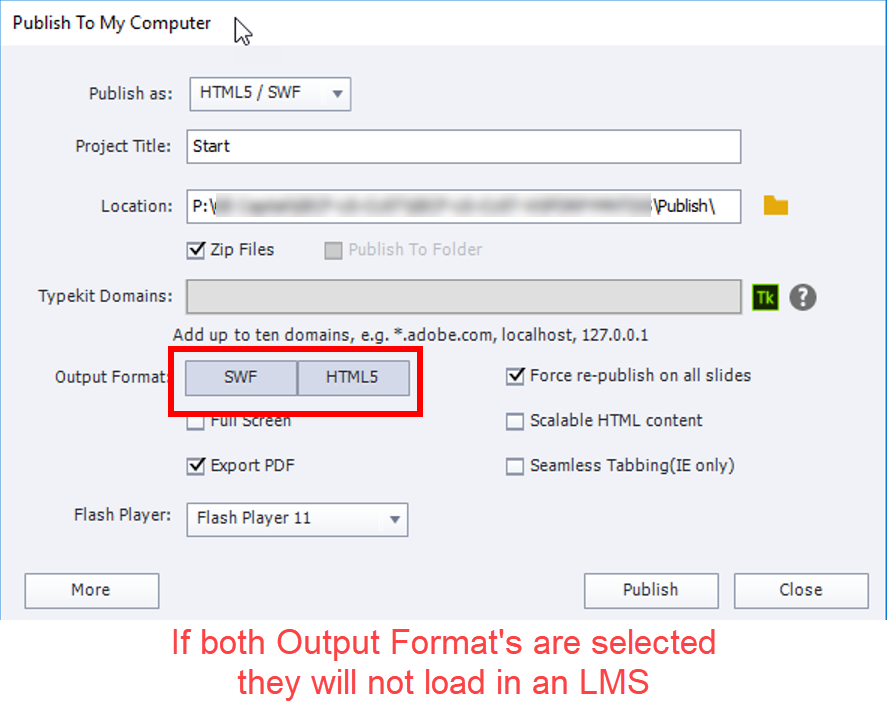
The Publish window seemingly allows you to select both Flash and HTML5 output at the same time. However, when I tried doing this, the published content didn’t load using Scorm Cloud or Litmos.
The publish has to be only for Flash, or only for HTML5 to load successfully. The screenshot below shows publish options in Adobe Captivate:
Here is the SCORM Cloud error message you will see if you attempt to publish for Flash and HTML5 simultaneously:
2. Text Entry with a Tab Key: Tablet Hard Keyboard Only
From my experience using a Samsung Galaxy Note Pro Android tablet, I've found that text entry with a tab key does not work in HTML5 on tablet soft keyboards. It doesn't work on desktop, either.
However, it did work when using a physical keyboard for the tablet.
This is because seamless tabbing, where the selected area moves throughout the screen and is not focused on the text entry object, is turned on for the tablet soft keyboard and for the desktop.
Still Having Trouble with Authoring Tools? We Can Help!
Thanks for reading — I hope my Captivate findings were useful to you. Keep an eye on this post and the Relate blog for updates, as I will be posting more helpful findings.
If you're struggling with any steps in LMS implementation, contact us today at Relate Corporation. With our 20+ years of solid experience in the training industry, we can assist in making your project a success. Feel free to call us at 1-800-428-3708, send us an e-mail at connect@relate.com, or fill out our contact form. We'd love to hear from you!
I've been working with learning management systems for over 20 years. I have run into both the good and the bad of an LMS. In this series of blog posts, I will discuss some of my findings for current authoring systems. In this blog, we will talk about Articulate Storyline 360.
Publishing to LMS
This section was updated with a new subsection on 5/1/2018.
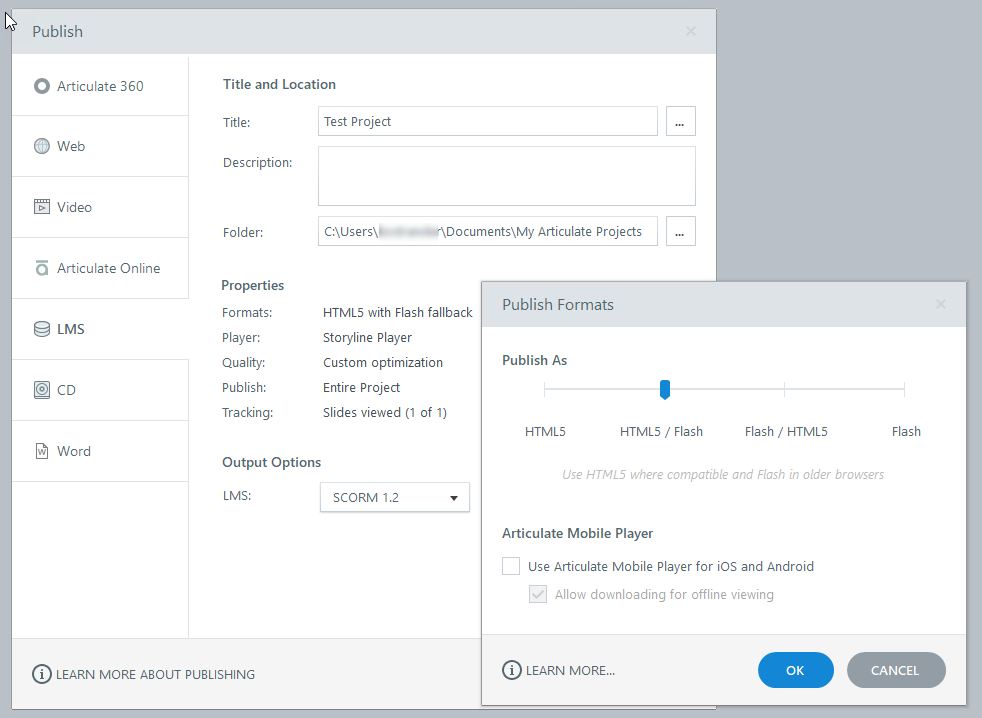
You can publish for Flash with HTML5 fallback, or HTML5 with Flash fallback and both ways will load successfully in an LMS:
Both publish methods work superficially. Once in a while a trigger will not work with this combination. When a trigger doesn’t work, it isn’t the same trigger type.
The solution is to publish for only one: Flash or HTML5.
Workaround for the "Jump to the Back" Issue
LMS environment used was Scorm Cloud, Litmos, iSpring Learn and Cornerstone (CSOD).
Using Internet Explorer, when the first slide is an .mp4 video, the course will start in the front on your desktop in your browser, but on an automatic jump to the next slide, it will wind up in the back on the desktop in your browser.
This issue does not occur when using Chrome or Firefox.
Below is a web link showing the .mp4 as the first slide. Note that because it is not in the LMS, you will not see the jump to the back.
As new versions of Storyline 360 are released, triggers and objects that were working may not work.
For example, the trigger for Media Completes was broken in Version 12. It worked in Version 11 and now in Version 13.
For the scroll area in Flash, the mouse scrolling doesn’t work for Internet Explorer 11. Don’t be mislead when it works in preview. It used to work in Storyline 360 Version 10. It no longer works for Version 11, 12, or 13.
The scroll bar in the scroll area has one look published, another look in preview, and another look in development:
Graphics
When you export a graphic, in our case a .png, your size will be a few pixels off from the original size. For example, if the original .png was 434x434, when saving this picture in Storyline it changes to 432x432. If you try to do a change picture after exporting this, it will blur.
Converting from Storyline 1 to Articulate Storyline 360
This section was added as an update to this blog article on 4/23/2018.
We needed to make changes to a Storyline 1 .story, using Storyline 360. We had player navigation buttons for Next, Prev. When we converted straight to 360, the navigation buttons no longer displayed, however, the button area was still active.
Two-Step Conversion
So we tried something different – converting from Storyline 1 to Storyline 2, then to Storyline 360. Using this two-step conversion method, the buttons were correctly retained.
Importing instead of Converting
However, to be more efficient, we tried importing to a new 360 project straight from Storyline 1. It worked! We had a 24 slide course, and checking everything, the conversion was good!
Example of a Successful Storyline Conversion
Note: The player buttons for the 360 version are gray, and there is an audio button to differentiate between the two versions.
We believe the conversion was accurate. Feel free to let us know if you see any problems in the 360 version!
Word Bank Quiz Question in Storyline 360
In the conversion we also saw that the Word Bank quiz question no longer worked without the Submit button. We were able to use "drag on" triggers in Storyline 1 and 2, but this currently isn’t the case in 360. (The "drag over" trigger, however, does still work in 360.) This is true in Storyline v3.15.15453.0 and in v3.14 as well.
Need Help with Articulate Storyline or other Tools?
If you need any help with LMS implementations, Relate can help. Feel free to write us at connect@relate.com (you can also message us on our contact form) or call us at 1-800-428-3708.
Yesterday, we tested the IK Multimedia iRig Pre HD mobile mic preamp on an iOS device, the iPad Air. They didn't give us the cable to connect to an Android device, that is, a Micro USB or USB 3.1 cable. Therefore, we had to wait until today to do an Android test; we used a Samsung Galaxy Note 8 phone. You can listen to the test recording below.
Today we tested the IK Multimedia iRig Pre HD, which we plan to use for some mobile recording. This is a compact mic preamp built for audio recording with mobile devices, but it also works on desktop or laptop computers. Below is our test recording using an iPad Air.
The iRig hooks up to your device using a USB cable, and has a micro USB port. The preamp comes with a cable to connect itself to a USB 2.0 A port, which you probably have on your computer. It also has a Lightning cable, but nothing for Micro USB or USB 3.1 Type C, which Android devices use. The iRig Pre HD has a 3.5mm headphone jack for its direct monitoring feature, which allows you to monitor the recording with no audio delay. From my test, that feature works very well, and offers a volume dial.
The microphone we used for this test was a RODE NT1000 condenser mic, which we used to test the 48V Phantom Power feature. The device comes with 2 alkaline AA batteries, and it seems to have handled the phantom power well. This is just an initial test, so we don't yet know how long the iRig can run on these batteries.
The device has two LED indicators, one to show you whether the phantom power is on, and one to show the levels. The levels indicator is very basic, so my expectations were low, but it works pretty well. It stays blue with no audio, it turns green when picking audio up, orange when it's louder, and red when it clips.
One thing to note if you're using this on desktop: I tested it briefly with Adobe Audition, and noticed it made my voice very high-pitched. Therefore, if you try the iRig out, make sure your Master Clock in your audio hardware settings is set to the iRig and not your sound card.
As for mobile apps, I used iRig Recorder Free with the iPad, and it has okay functions offered for free. Basically, you get to record, listen, and export as .m4a for free. All other features require micro-transactions to unlock. I assume this device also works with other recording apps, and that is something we may test in the future.
Last week, we commented in our Focus Test article about the Panasonic GH5's relatively slow autofocus. We found that, even since the firmware update, its focus was the slowest in our "distraction test." This echoed the experiences of many GH5 owners worldwide, but a workaround has recently been discovered.
On February 4, photography YouTuber YodaYeo posted a video detailing his discovery of a fix for the GH5's sluggish focus, video below:
Essentially, reducing your shutter angle to below 180 degrees speeds up the Panasonic GH5's autofocus dramatically.
For those unfamiliar with shutter angle, it's a filmmaking term that refers to a relationship between shutter speed and framerate. The use of degrees and angle was relevant to how older video cameras worked. Essentially, a higher shutter angle means a slower shutter speed relative to framerate, and vice versa.
Keeping a shutter angle of around than 180 is considered a "golden rule" of video. This is because it results in enough motion blur to eliminate jerkiness, but not too much. A 180 degree shutter angle translates to a shutter speed of 1/60 at 30 fps and a speed of 1/50 at 25 fps. YodaYeo's test, however, shows that this rule doesn't quite hold when it comes to the GH5.
If you've done a lot of video shooting, you probably find the prospect of having to use a smaller shutter angle unpleasant. "It'll be like watching a slideshow," you may think. Fortunately, as Matt Krieg demonstrates in the following video, a shutter angle of 179 will suffice.
In the video, Matt shows how to set your Panasonic GH5 to shutter angle mode, and then set your shutter angle to 179 degrees. He then performs tests with many different lenses to show the difference in focus speed with YodaYeo's fix.
[embed][/embed]
A few days later, YodaYeo posted a video, shown below, explaining the mechanics of this fix. It's rather technical, and very fascinating for those interested in how cameras function. The gist is that, for the best autofocus performance, the camera needs time to capture two images per video frame. Only one of these is actually saved as a video frame, but both are used by the camera for autofocus adjustment.
This is ideally possible at 180deg shutter angle with a framerate of exactly half the refresh rate. At 50Hz, which is PAL, this is 25fps, and in NTSC (59.94hz), this is 29.97fps. PAL stands for Phase Alternating Line, and NTSC stands for National Television System Committee. The difference is too technical to get into here, but NTSC is the USA standard, and PAL is standard in Europe.
However, the GH5's new focus system apparently does not compensate for the fact that it is using a complimentary metal-oxide semiconductor (CMOS) sensor.
As YodaYeo outlines in his explanation video, the GH5's sensor takes slightly longer than the shutter speed to capture an image. Because it takes a tiny bit longer than half of a refresh frame to take an image, the camera can't capture that second, autofocus-only image.
What does this have to do with the sensor type? Years ago, most digital cameras used charge-coupled device (CCD) sensors. Now the majority use complimentary metal-oxide semiconductor (CMOS) sensors, also known as active pixel sensors (APS).
There are a lot of reasons for this: CMOS sensors are cheaper, therefore making larger ones is more practical, and they consume less battery power per shot. CMOS sensors are typically more durable, lasting for more shots than CCDs.
The difference that concerns this article, however, is the pattern in which they capture images.
Namely, a CCD camera has a "global shutter," which means that when you take a picture, the whole sensor captures the image at once.
In contrast, a CMOS camera has a "rolling shutter," which means it captures the image row-by-row. This happens very quickly, but as YodaYeo points out, it takes a very slight amount of additional time. This tiny delay disrupts the otherwise perfect synchronization between refresh rate and framerate.
Global shutter (left) and rolling shutter (right).
The question now is whether Panasonic will spot these videos and release a firmware update to compensate for this issue. If that happens, the GH5's focus would be greatly improved with no need for end-user fiddling.
There was one more issue we encountered in our focus test with the GH5, that is, its tracking autofocus tended to get distracted. Therefore, we also suggest that you watch Matt Krieg's Auto-focus Pulsing video. He describes how to change your GH5's focus speed and sensitivity settings to match your shooting needs.
We've also run our own test on the GH5 using the 179 degree shutter angle fix. Our findings echo those of others; the focus is noticeably faster than before, but still slower than Sony cameras. The video is below:
Because this fix worked for the GH5, we did a quick test with the GH4 to see if its focus time would also improve. Unfortunately, it does not seem to have made the same difference on the GH4. With the shutter angle set to either 180 or 179 degrees, it took about one second to acquire focus.
One of the selling points of the GH5 was that its sensor drive speed is twice that of the GH4. Maybe this could explain the contrasting results of our tests. You can see our test below:
Since the inital findings, both YodaYeo and Matt Krieg have continued to post updates on their GH5 focus findings. So, if you're a Panasonic GH5 user, we recommend subscribing and keeping up on whatever else they discover.
Yesterday, our good friend Curtis Judd from www.learnlightandsound.com released a primer on what a mixing board is for and how to use it. This is a perfect guide if you want to mix audio, but find the complexity of mixer interfaces daunting.
If you need to do audio mixing, for podcasts, videos, music, voice and narration, etc, this is an excellent resource. Last week, we posted a tutorial on creating your own podcasting setup. Curtis' video below will serve as an excellent addition to make the tools of audio production accessible to you.
Broadcasting your own show has become easier than ever, but trying to find good information on the basics of how to create your own podcasting or video broadcasting setup can be daunting, so we've put together a video guide to help you get started, based on what we use for our RELATECASTS shows.
Click the preview image below to view the original iSpring presentation. For mobile devices (or browsers without Flash support), scroll down to the Vimeo video.
Though we didn't mention them in the video, our current go-to capture card brand is Magewell.
If you're using a laptop setup, the Magewell USB 3.0 HDMI Video Capture cards are an excellent choice that we've found is fast and reliable.
For our desktop setup, we're using two cards: the Magewell Pro Capture Quad HDMI card, and the Magewell Pro Capture Quad SDI card, which gives us the ability to connect up to 8 cameras if we need to, 4 through HDMI and 4 through SDI. These cards plug right into your computer's PCI slots with their PCI 4x connectors.





 mobile mic preamp on an iOS device, the iPad Air. They didn't give us the cable to connect to an Android device, that is, a Micro USB or USB 3.1 cable. Therefore, we had to wait until today to do an Android test; we used a Samsung Galaxy Note 8 phone. You can listen to the test recording below.

 cards are an excellent choice that we've found is fast and reliable.
 card, and the
  card, which gives us the ability to connect up to 8 cameras if we need to, 4 through HDMI and 4 through SDI. These cards plug right into your computer's PCI slots with their PCI 4x connectors.