Recently at RELATE, we were using the Canon 50mm EF f/1.4 USM and Sigma 50mm f/1.4 Art DG lenses with our EOS R and the EF-EOS R adapter. This got us thinking: are the results really that different?
Therefore, we did a small test with portraiture, which is the type of shot we typically use these lenses for. Camera settings were at 1/125 sec. shutter and ISO 1000, while both lenses were at f/1.4. We've heard that the differences between these lenses are most pronounced when wide open.
This is because the Canon has 7 lens elements, while the Sigma has 13 lens elements. The Sigma includes an aspherical element, which should reduce spherical aberration when wide open. This is the softness that many lenses suffer at large apertures. However, due to these additional elements, the Sigma is twice the size, thrice the price, and three times the weight.
The Canon 50mm EF f/1.4 USM is around $325-350 USD new, while the Sigma 50mm f/1.4 Art DG is ≈$950 USD new.
Therefore, we'll take a couple photos from each lens and compare:
1. The overall look of the photos.2. Resolution of fine details.3. Chromatic aberration.
Lens Comparison #1: Overall look
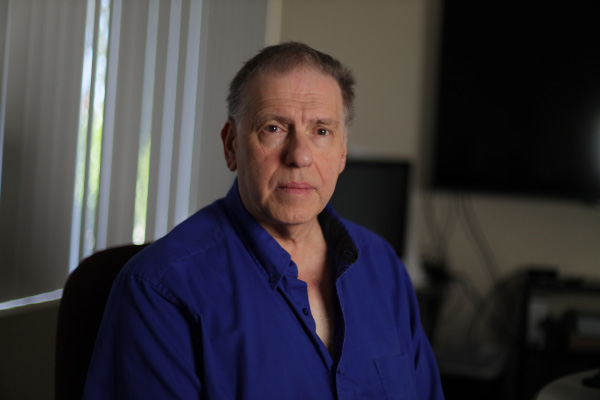
Canon 50mm EF f/1.4 USM (click for full resolution)
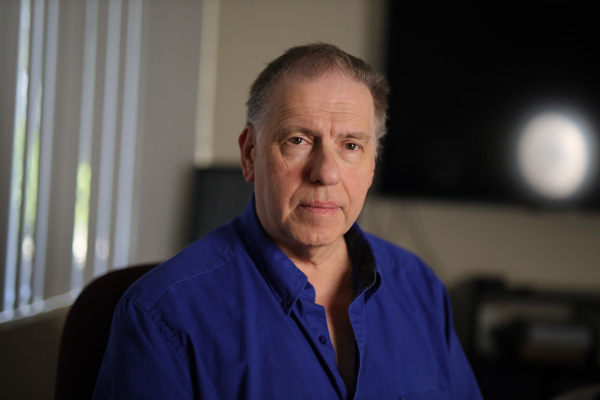
Sigma 50mm f/1.4 Art DG (click for full resolution)
Canon 50mm EF f/1.4 USM (click for full resolution)
Sigma 50mm f/1.4 Art DG (click for full resolution)
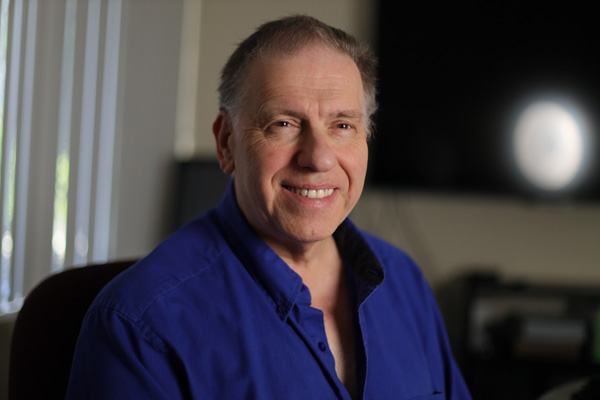
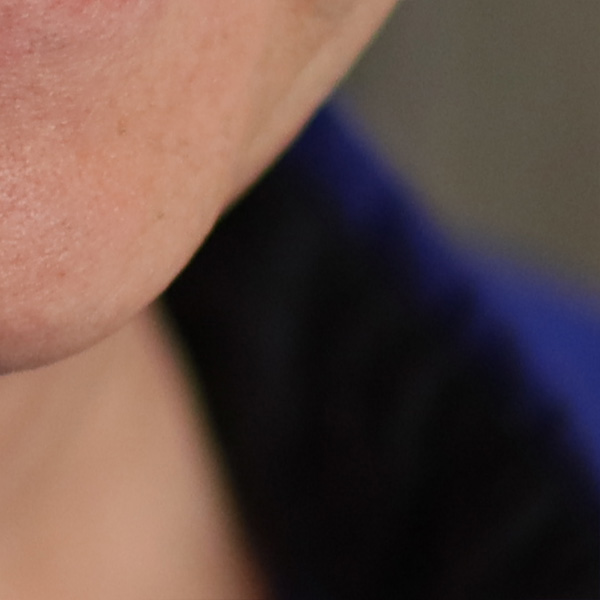
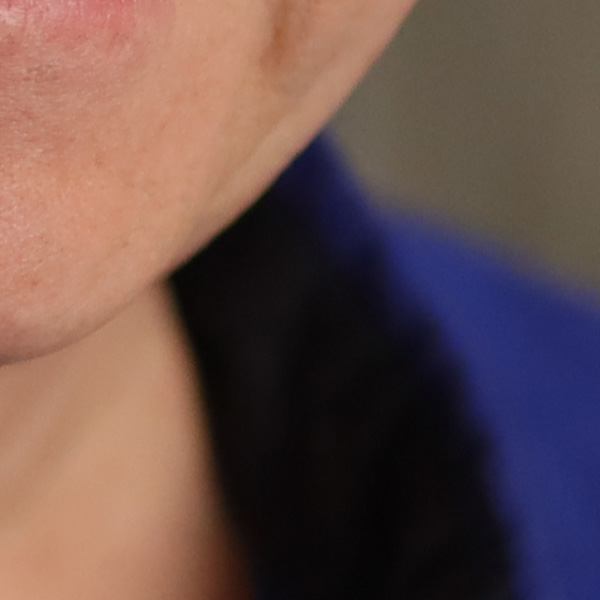
You can click the links in order to view these at full resolution, and I recommend you do so! Towards the center of the frame (which is around Rick's chin) the images are pretty similar. As you move further out, though, the effect of the Sigma's aspherical element allows it to stay sharper. I'll detail this further in the next section, and show some close-ups.
Lens Comparison #2: Resolution of fine details
In this image, I'll start by comparing zooms near the center of the frame. This is where the two should be most similar in terms of fine detail. Again, you can use the links above to see the photos in full resolution, if you prefer.
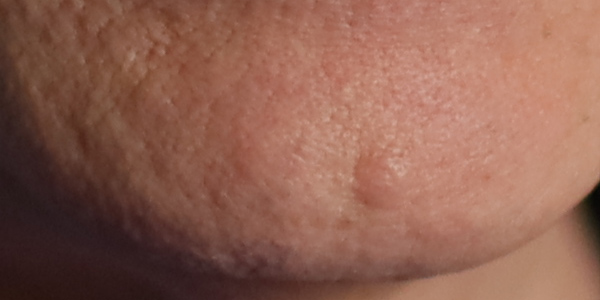
Canon 50mm EF f/1.4 USM
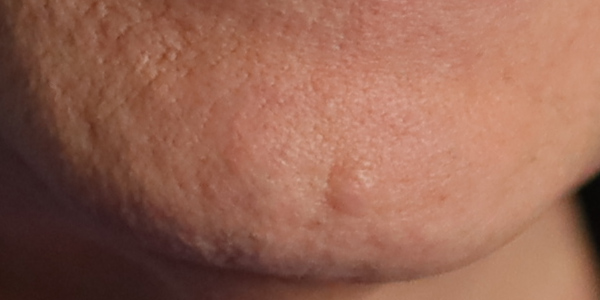
Sigma 50mm f/1.4 Art DG
As we can see, at the very center of the frame, the lenses are similar, even wide open. Therefore, we'll go a bit further up in the image.
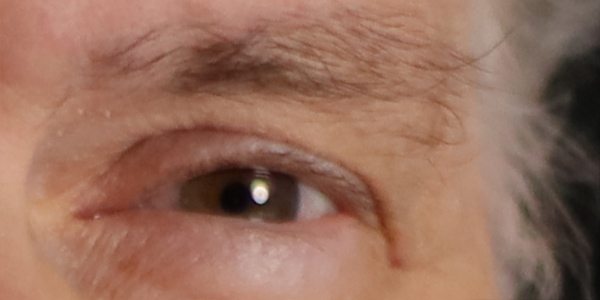
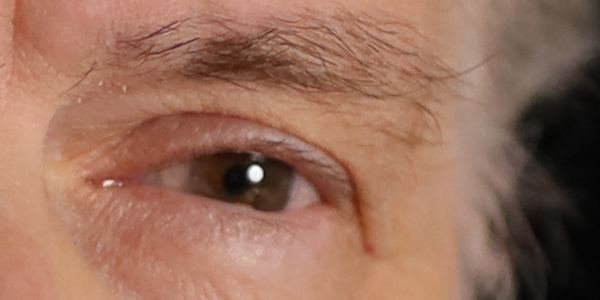
Canon 50mm EF f/1.4 USM
Sigma 50mm f/1.4 Art DG
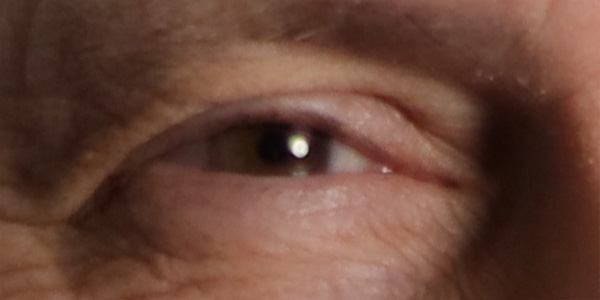
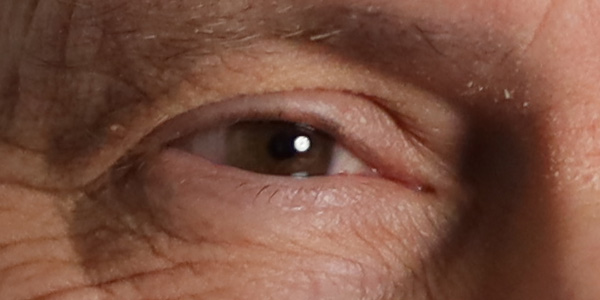
This is the eye that was slightly further from the camera. Hence, on both images, we're seeing slight blurring due to the extremely shallow depth of field at f/1.4. Still, with the Canon lens we're starting to see the effects of spherical aberration. Here, it manifests as a slight "smearing" of the image. Even so, they're not that far off from each other. The final crop will be much closer to the edge of the photo.
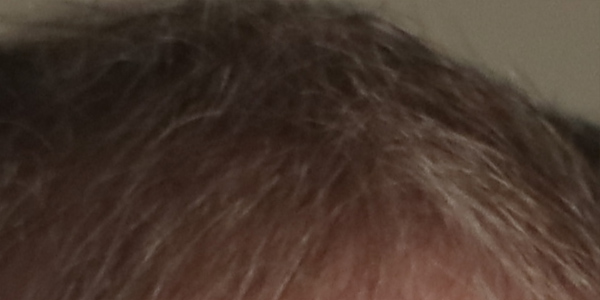
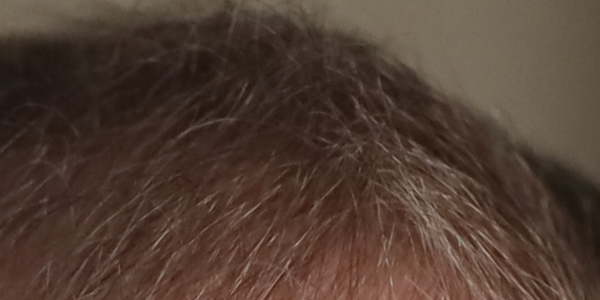
Canon 50mm EF f/1.4 USM
Sigma 50mm f/1.4 Art DG
Here, the difference is most pronounced. On the Sigma shot, the hair towards the foreground is quite sharp, and blurs further back due to shallow DoF. On the Canon lens shot, though, the whole thing is noticeably blurry.
Lens Comparison #3: Chromatic aberration
Our final comparison is chromatic aberration. There are a few points where we'll compare, but this particular type of photo isn't the best to showcase this. This is because there are no objects with sharp edges or a lot of bright points of light. Therefore, this would be more of a concern with still lifes, macro photography, and night shots.
Landscapes and other outdoor photos might have bright points of light and sharp edges, but it's less of a concern there. That's because you'll usually shoot those at smaller apertures, both for deeper DoF and because daylight is so bright.
First, we'll compare the eye highlights.
Canon 50mm EF f/1.4 USM
Sigma 50mm f/1.4 Art DG
Chromatic aberration is probably more evident here than anywhere else in the picture. Even so, it's not obvious. The eye glint looks like a white disc with several faint colored discs slightly overlapping. Separating the channels, I found that in this area of the image, blues shifted lower-left, while reds shifted slightly upwards.
The animations below show this crop in each color channel.
Canon 50mm EF f/1.4 USM
Sigma 50mm f/1.4 Art DG
As you can see, the highlight shifts slightly more on the Canon shot, while the Sigma's highlight stays in place. There is a slight amount of chromatic aberration on the blue channel even with the Sigma, though.
Our next chromatic aberration test is on the edges of shapes. As we mentioned earlier, this will be less noticeable on a portrait. This is because the edges of a face will blur more at a larger aperture. Meanwhile, chromatic aberration is less pronounced at smaller apertures.
Canon 50mm EF f/1.4 USM
Sigma 50mm f/1.4 Art DG
While a slight shift of the green channel is visible in this area of the Canon photo, it's relatively mild. Towards the edges of the picture, spherical aberration dwarfs the chromatic aberration effect, so it's harder to tell how pronounced it is.
Therefore, I don't think the difference in chromatic aberration will be a major problem for the majority of photo types. Only specific types of shots would highlight the difference here. For example, if you photographed a stark black-and-white polka dot pattern wide open, it may become noticeable.
After all these tests, we come back to the question: is the difference noticeable? Although I didn't notice much difference at first, after closer examination, it's somewhat obvious. However, keep in mind that these were shot at conditions where an aspherical lens element would make significant difference. At smaller aperture values, the differences between the lenses become less and less pronounced.
Overall, your best bet is to compare these lenses and their potential differences against your needs. Do you shoot at large apertures often, and are fine details and sharp edges all throughout the frame essential? If so, does this outweigh the big differences in price, weight, and size?
If you often travel with your camera, weight and size could be a major consideration. One lens is slightly over half a pound, the other is nearly two, the Canon at 290g and Sigma at 815g.
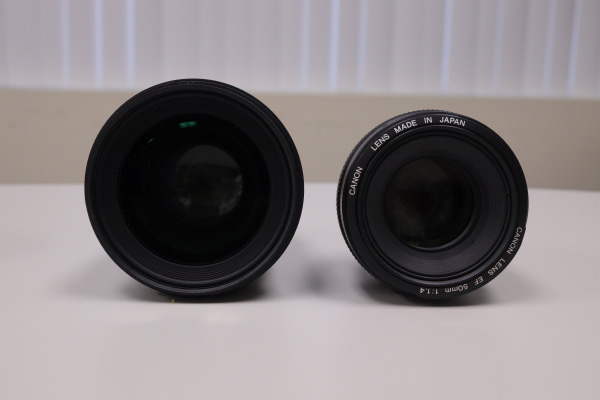
Note the difference in size of each lens' front element.
In terms of dimensions, the Canon is 2.9" x 2" dia. or 73.8mm x 50.5mm dia. Meanwhile, the Sigma is 3.9" x 3.4" dia. or 99.9mm x 85.4mm dia. This means that the Canon lens takes three-quarters of the volume in your camera bag. This doesn't include lens hoods. The Canon 50mm doesn't come with a lens hood, while the Sigma does. While hoods add bulk to your kit, they're a good idea if you're going traveling. Of course, lens flares can be quite trendy in photography nowadays when used consciously!
We tend to take the Canon lens on trips, but the Sigma is an excellent studio lens with crisp resolution of details.
Hopefully this article, though somewhat limited in scope, was helpful to you!
If you found it useful, you can find my other articles on photography and design here.For our articles on photography topics only, follow this link.
When creating an eLearning course, you need all the help you can get in making the material engaging and interesting. Voice-over is a common tool used towards this end. However, editing voice-over clips is a potentially time-consuming process. You could have hundreds or even thousands of clips for a single course.
If you don't have an efficient workflow, this could consume many hours and push your project well outside of scope. Fortunately, modern audio editing software offers features that make this a quick and very straightforward job.
Although similar editing workflows exist in all modern audio editing suites, we'll cover Adobe Audition, because it's so commonly-used. If you're using another program, the terminology will be similar, but the exact keyboard shortcuts will vary. Therefore, if you're using another, you'll need to look up the terms in your editing suite's hotkey reference.
Also, for the purposes of this article, I am using Windows 10; some details may vary if you're on Mac or Linux.
You can jump to later parts of the article using these links:
First, we're going to cover what this article is assuming you have.
1. What You Need Before Editing Voice-Over
In order to know where to cut your audio clips and name them properly, you'll need the script for your eLearning piece on hand. You'll need a standardized naming convention for audio clips, too. Otherwise, your developers will have trouble knowing what to put where. Or, if you're doing the development, you may forget what goes where by the time you need to insert the audio!
The format we'll use here is module, page, element. For example, M05P11G would indicate course module 5, page 11, element G, which corresponds to the format in our script.
You'll then need the raw audio file. For the purposes of this article, we will mark, cut, add silence, and reduce volume on certain sections. In practice, you will probably end up using Amplify and other processing techniques to get the volume and qualities you want. For now, though, we'll keep it simple.
Always keep an unaltered original version of your raw audio file. This way, if you make a mistake and accidentally save it, you can start over. Ideally, you'll keep your copy for editing in a different folder than the original to minimize accidental modifications.
Now, bring the copy of the file you'll use for editing into Audition. Drag it into the "Files" panel, like so:
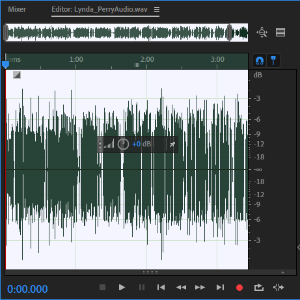
As you can see, doing this creates a .pkf in the same directory as your file, which is a "peak file." This is generated by Audition and is needed in order to render the clip's waveform in the Editor view. Here is what the waveform looks like in that Editor panel:
The next two steps are optional, and you may not need them if you've already set Audition to your needs. Therefore, if that's the case, you can skip to "Marking Your Voice-Over Clips."
1a. Adding a "Silence" Shortcut
If you already have a preexisting shortcut that you prefer to use when silencing sections of audio, you can skip this section. We're going to set up a shortcut to silence using a Fade Envelope, but first I'll explain why that's helpful.
Sometimes, you'll want to remove a part of the audio clip, but you want the time it occupies to remain. A cough or breath, for example, may need to be removed, but you find that simply deleting it makes the sentence sound awkward.
If there is background noise in your recording, silencing it may also sound abrupt, because the noise is silenced too.
In this case, fading out at the start of your selection and fading back in at the end is ideal. This is what Fade Envelope will do for us. In order to make a shortcut for this, we'll need to record a "Favorite."
The first thing we'll need to do is Select All, so click on your waveform and hit Ctrl + A. Your waveform should become highlighted, like this:
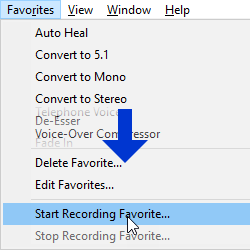
Next, go to the menu bar and click Favorites, then click an option near the bottom called "Start Recording Favorite."
This will save all of your actions inside Audition until you stop recording.
This handy feature can save you thousands of menu clicks, which would otherwise add up to a lot of wasted time.
Now, go to the menu bar again. Select Effects > Amplitude and Compression > Fade Envelope (process)...
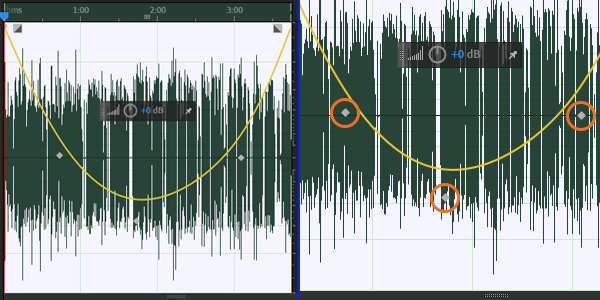
This will bring up a window for Fade Envelope, but will also overlay a "U" shape onto your waveform, shown below. There will also be three nearly-invisible handles, and I've circled them below.
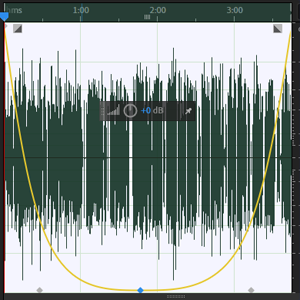
Drag the handles to get the shape below, and then click Apply, and Favorites > Stop Recording Favorite... Give it a descriptive name, like Fade Envelope Silence.
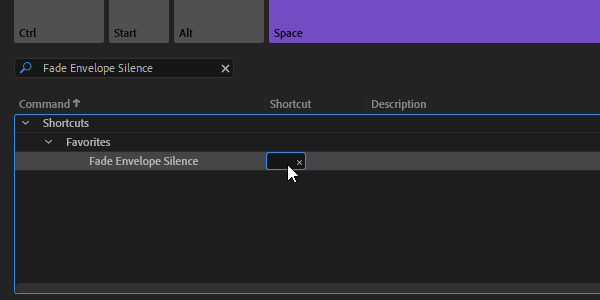
Press Alt + K, which will open your Keyboard Shortcuts dialogue. Then, select the search bar in the lower left of that window, type in your Favorite's name.
Click the space below Shortcut and to the right of your Favorite, then press an unused key. I'm using F. Afterwards, clicking F will perform the Favorite on whatever you have selected.
1b. Workspace Setup
The next step before we start is to ensure we have the correct panels displayed in our Adobe Audition workspace. The only three that are necessary are Files, Editor, and Markers. If any of these aren't visible, go to Window in the menu bar and enable them.
Other panels that are helpful are Selection/View and Levels. Selection/View displays the duration of your selection, plus where it starts and ends within the file's total duration.
2. Marking Your Voice-Over Clips
In order to mark a clip, you click and drag to select a section and press M. Then, in your Markers panel, you'll need to rename your clip. In order to do this, click the clip's name ("Marker 1, Marker 2," etc.) once, then click again about half a second later. If you double-click too fast, it won't work. Once the name is highlighted, type in the clip's title.
Continue doing this for all of the clips in the audio file until everything is marked. Remember to save your file frequently with Ctrl + S! When marking your clips, it's a good practice to leave about half a second of silence before and after the clip.
This is because many authoring tools have a tendency to cut off the very beginning or end of audio clips. Therefore, leaving this space will ensure that the entire audio clip is played for the user.
R
3. Exporting Your Clips To Individual Files
Once you are finished, look at your Markers panel again and select all of the clips you've marked and named. Now that they're all selected, click on this little button
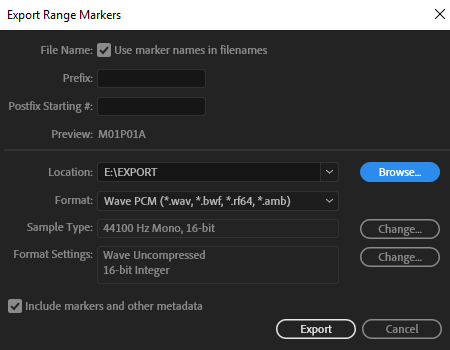
to export them. It's the fifth from the left in the upper left of the Markers panel, which I have pointed out with an arrow below. A dialog will come up, and there are a few options here.
You'll want to check the first option, "Use marker names in filenames," or your efforts in naming every clip will be wasted! "Prefix" allows you to add a static prefix to each exported file's name. Meanwhile, Postfix is for a certain type of postfix—an incremental number. If you put 01 here, for example, the first filename ends with 01, the second with 02, and so on. This can be useful for exporting a large number of clips with directly sequential names.
Next, set your export directory to the correct location, then check your file format. Many authoring tools work better with .wav, but all of this will depend on your filesize needs. For our purposes, you can leave the last checkbox checked or unchecked; it won't make a difference here.
We hope this guide helped you with your eLearning course. If you need any help with eLearning and training development, feel free to contact us on our website: http://relate.com/contact.html
 Recently at RELATE, we were using the Canon 50mm EF f/1.4 USM and Sigma 50mm f/1.4 Art DG lenses with our EOS R and the EF-EOS R adapter. This got us thinking: are the results really that different?
Therefore, we did a small test with portraiture, which is the type of shot we typically use these lenses for. Camera settings were at 1/125 sec. shutter and ISO 1000, while both lenses were at f/1.4. We've heard that the differences between these lenses are most pronounced when wide open.
This is because the Canon has 7 lens elements, while the Sigma has 13 lens elements. The Sigma includes an aspherical element, which should reduce spherical aberration when wide open. This is the softness that many lenses suffer at large apertures. However, due to these additional elements, the Sigma is twice the size, thrice the price, and three times the weight.
Recently at RELATE, we were using the Canon 50mm EF f/1.4 USM and Sigma 50mm f/1.4 Art DG lenses with our EOS R and the EF-EOS R adapter. This got us thinking: are the results really that different?
Therefore, we did a small test with portraiture, which is the type of shot we typically use these lenses for. Camera settings were at 1/125 sec. shutter and ISO 1000, while both lenses were at f/1.4. We've heard that the differences between these lenses are most pronounced when wide open.
This is because the Canon has 7 lens elements, while the Sigma has 13 lens elements. The Sigma includes an aspherical element, which should reduce spherical aberration when wide open. This is the softness that many lenses suffer at large apertures. However, due to these additional elements, the Sigma is twice the size, thrice the price, and three times the weight.
 The Canon 50mm EF f/1.4 USM is around $325-350 USD new, while the Sigma 50mm f/1.4 Art DG is ≈$950 USD new.
Therefore, we'll take a couple photos from each lens and compare:
1. The overall look of the photos.
2. Resolution of fine details.
3. Chromatic aberration.
The Canon 50mm EF f/1.4 USM is around $325-350 USD new, while the Sigma 50mm f/1.4 Art DG is ≈$950 USD new.
Therefore, we'll take a couple photos from each lens and compare:
1. The overall look of the photos.
2. Resolution of fine details.
3. Chromatic aberration.
 Canon 50mm EF f/1.4 USM (click for full resolution)
 Sigma 50mm f/1.4 Art DG (click for full resolution)
 Canon 50mm EF f/1.4 USM (click for full resolution)
 Sigma 50mm f/1.4 Art DG (click for full resolution)
You can click the links in order to view these at full resolution, and I recommend you do so! Towards the center of the frame (which is around Rick's chin) the images are pretty similar. As you move further out, though, the effect of the Sigma's aspherical element allows it to stay sharper. I'll detail this further in the next section, and show some close-ups.
Sigma 50mm f/1.4 Art DG (click for full resolution)
You can click the links in order to view these at full resolution, and I recommend you do so! Towards the center of the frame (which is around Rick's chin) the images are pretty similar. As you move further out, though, the effect of the Sigma's aspherical element allows it to stay sharper. I'll detail this further in the next section, and show some close-ups.
 Canon 50mm EF f/1.4 USM
 Sigma 50mm f/1.4 Art DG
As we can see, at the very center of the frame, the lenses are similar, even wide open. Therefore, we'll go a bit further up in the image.
Sigma 50mm f/1.4 Art DG
As we can see, at the very center of the frame, the lenses are similar, even wide open. Therefore, we'll go a bit further up in the image.
 Canon 50mm EF f/1.4 USM
 Sigma 50mm f/1.4 Art DG
This is the eye that was slightly further from the camera. Hence, on both images, we're seeing slight blurring due to the extremely shallow depth of field at f/1.4. Still, with the Canon lens we're starting to see the effects of spherical aberration. Here, it manifests as a slight "smearing" of the image. Even so, they're not that far off from each other. The final crop will be much closer to the edge of the photo.
Sigma 50mm f/1.4 Art DG
This is the eye that was slightly further from the camera. Hence, on both images, we're seeing slight blurring due to the extremely shallow depth of field at f/1.4. Still, with the Canon lens we're starting to see the effects of spherical aberration. Here, it manifests as a slight "smearing" of the image. Even so, they're not that far off from each other. The final crop will be much closer to the edge of the photo.
 Canon 50mm EF f/1.4 USM
 Sigma 50mm f/1.4 Art DG
Here, the difference is most pronounced. On the Sigma shot, the hair towards the foreground is quite sharp, and blurs further back due to shallow DoF. On the Canon lens shot, though, the whole thing is noticeably blurry.
Sigma 50mm f/1.4 Art DG
Here, the difference is most pronounced. On the Sigma shot, the hair towards the foreground is quite sharp, and blurs further back due to shallow DoF. On the Canon lens shot, though, the whole thing is noticeably blurry.
 Canon 50mm EF f/1.4 USM
 Sigma 50mm f/1.4 Art DG
Chromatic aberration is probably more evident here than anywhere else in the picture. Even so, it's not obvious. The eye glint looks like a white disc with several faint colored discs slightly overlapping. Separating the channels, I found that in this area of the image, blues shifted lower-left, while reds shifted slightly upwards.
The animations below show this crop in each color channel.
Sigma 50mm f/1.4 Art DG
Chromatic aberration is probably more evident here than anywhere else in the picture. Even so, it's not obvious. The eye glint looks like a white disc with several faint colored discs slightly overlapping. Separating the channels, I found that in this area of the image, blues shifted lower-left, while reds shifted slightly upwards.
The animations below show this crop in each color channel.
 Canon 50mm EF f/1.4 USM
 Sigma 50mm f/1.4 Art DG
As you can see, the highlight shifts slightly more on the Canon shot, while the Sigma's highlight stays in place. There is a slight amount of chromatic aberration on the blue channel even with the Sigma, though.
Our next chromatic aberration test is on the edges of shapes. As we mentioned earlier, this will be less noticeable on a portrait. This is because the edges of a face will blur more at a larger aperture. Meanwhile, chromatic aberration is less pronounced at smaller apertures.
Sigma 50mm f/1.4 Art DG
As you can see, the highlight shifts slightly more on the Canon shot, while the Sigma's highlight stays in place. There is a slight amount of chromatic aberration on the blue channel even with the Sigma, though.
Our next chromatic aberration test is on the edges of shapes. As we mentioned earlier, this will be less noticeable on a portrait. This is because the edges of a face will blur more at a larger aperture. Meanwhile, chromatic aberration is less pronounced at smaller apertures.
 Canon 50mm EF f/1.4 USM
 Sigma 50mm f/1.4 Art DG
While a slight shift of the green channel is visible in this area of the Canon photo, it's relatively mild. Towards the edges of the picture, spherical aberration dwarfs the chromatic aberration effect, so it's harder to tell how pronounced it is.
Therefore, I don't think the difference in chromatic aberration will be a major problem for the majority of photo types. Only specific types of shots would highlight the difference here. For example, if you photographed a stark black-and-white polka dot pattern wide open, it may become noticeable.
After all these tests, we come back to the question: is the difference noticeable? Although I didn't notice much difference at first, after closer examination, it's somewhat obvious. However, keep in mind that these were shot at conditions where an aspherical lens element would make significant difference. At smaller aperture values, the differences between the lenses become less and less pronounced.
Overall, your best bet is to compare these lenses and their potential differences against your needs. Do you shoot at large apertures often, and are fine details and sharp edges all throughout the frame essential? If so, does this outweigh the big differences in price, weight, and size?
If you often travel with your camera, weight and size could be a major consideration. One lens is slightly over half a pound, the other is nearly two, the Canon at 290g and Sigma at 815g.
Sigma 50mm f/1.4 Art DG
While a slight shift of the green channel is visible in this area of the Canon photo, it's relatively mild. Towards the edges of the picture, spherical aberration dwarfs the chromatic aberration effect, so it's harder to tell how pronounced it is.
Therefore, I don't think the difference in chromatic aberration will be a major problem for the majority of photo types. Only specific types of shots would highlight the difference here. For example, if you photographed a stark black-and-white polka dot pattern wide open, it may become noticeable.
After all these tests, we come back to the question: is the difference noticeable? Although I didn't notice much difference at first, after closer examination, it's somewhat obvious. However, keep in mind that these were shot at conditions where an aspherical lens element would make significant difference. At smaller aperture values, the differences between the lenses become less and less pronounced.
Overall, your best bet is to compare these lenses and their potential differences against your needs. Do you shoot at large apertures often, and are fine details and sharp edges all throughout the frame essential? If so, does this outweigh the big differences in price, weight, and size?
If you often travel with your camera, weight and size could be a major consideration. One lens is slightly over half a pound, the other is nearly two, the Canon at 290g and Sigma at 815g.
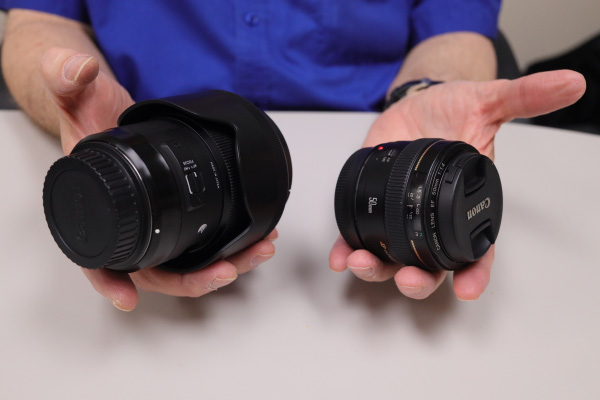
 Note the difference in size of each lens' front element.
In terms of dimensions, the Canon is 2.9" x 2" dia. or 73.8mm x 50.5mm dia. Meanwhile, the Sigma is 3.9" x 3.4" dia. or 99.9mm x 85.4mm dia. This means that the Canon lens takes three-quarters of the volume in your camera bag. This doesn't include lens hoods. The Canon 50mm doesn't come with a lens hood, while the Sigma does. While hoods add bulk to your kit, they're a good idea if you're going traveling. Of course, lens flares can be quite trendy in photography nowadays when used consciously!
We tend to take the Canon lens on trips, but the Sigma is an excellent studio lens with crisp resolution of details.
Hopefully this article, though somewhat limited in scope, was helpful to you!
If you found it useful, you can find my other articles on photography and design here.For our articles on photography topics only, follow this link.
Note the difference in size of each lens' front element.
In terms of dimensions, the Canon is 2.9" x 2" dia. or 73.8mm x 50.5mm dia. Meanwhile, the Sigma is 3.9" x 3.4" dia. or 99.9mm x 85.4mm dia. This means that the Canon lens takes three-quarters of the volume in your camera bag. This doesn't include lens hoods. The Canon 50mm doesn't come with a lens hood, while the Sigma does. While hoods add bulk to your kit, they're a good idea if you're going traveling. Of course, lens flares can be quite trendy in photography nowadays when used consciously!
We tend to take the Canon lens on trips, but the Sigma is an excellent studio lens with crisp resolution of details.
Hopefully this article, though somewhat limited in scope, was helpful to you!
If you found it useful, you can find my other articles on photography and design here.For our articles on photography topics only, follow this link.


 to export them. It's the fifth from the left in the upper left of the Markers panel, which I have pointed out with an arrow below. A dialog will come up, and there are a few options here.