
If you don't have an efficient workflow, this could consume many hours and push your project well outside of scope. Fortunately, modern audio editing software offers features that make this a quick and very straightforward job.
Although similar editing workflows exist in all modern audio editing suites, we'll cover Adobe Audition, because it's so commonly-used. If you're using another program, the terminology will be similar, but the exact keyboard shortcuts will vary. Therefore, if you're using another, you'll need to look up the terms in your editing suite's hotkey reference.
Also, for the purposes of this article, I am using Windows 10; some details may vary if you're on Mac or Linux.
You can jump to later parts of the article using these links:
1. What You Need Before Editing Voice-Over
1a. Adding a "Silence" Shortcut (Optional)
1b. Workspace Setup (Optional)
2. Marking Your Voice-Over Clips
3. Exporting Your Clips To Individual Files
First, we're going to cover what this article is assuming you have.
1. What You Need Before Editing Voice-Over
In order to know where to cut your audio clips and name them properly, you'll need the script for your eLearning piece on hand. You'll need a standardized naming convention for audio clips, too. Otherwise, your developers will have trouble knowing what to put where. Or, if you're doing the development, you may forget what goes where by the time you need to insert the audio!The format we'll use here is module, page, element. For example, M05P11G would indicate course module 5, page 11, element G, which corresponds to the format in our script.
You'll then need the raw audio file. For the purposes of this article, we will mark, cut, add silence, and reduce volume on certain sections. In practice, you will probably end up using Amplify and other processing techniques to get the volume and qualities you want. For now, though, we'll keep it simple.
Always keep an unaltered original version of your raw audio file. This way, if you make a mistake and accidentally save it, you can start over. Ideally, you'll keep your copy for editing in a different folder than the original to minimize accidental modifications.
Now, bring the copy of the file you'll use for editing into Audition. Drag it into the "Files" panel, like so:
As you can see, doing this creates a .pkf in the same directory as your file, which is a "peak file." This is generated by Audition and is needed in order to render the clip's waveform in the Editor view. Here is what the waveform looks like in that Editor panel:

1a. Adding a "Silence" Shortcut
If you already have a preexisting shortcut that you prefer to use when silencing sections of audio, you can skip this section. We're going to set up a shortcut to silence using a Fade Envelope, but first I'll explain why that's helpful.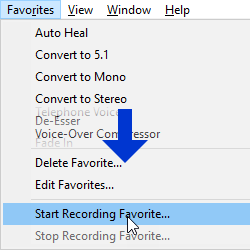 Sometimes, you'll want to remove a part of the audio clip, but you want the time it occupies to remain. A cough or breath, for example, may need to be removed, but you find that simply deleting it makes the sentence sound awkward.
If there is background noise in your recording, silencing it may also sound abrupt, because the noise is silenced too.
In this case, fading out at the start of your selection and fading back in at the end is ideal. This is what Fade Envelope will do for us. In order to make a shortcut for this, we'll need to record a "Favorite."
This will save all of your actions inside Audition until you stop recording.
This handy feature can save you thousands of menu clicks, which would otherwise add up to a lot of wasted time.
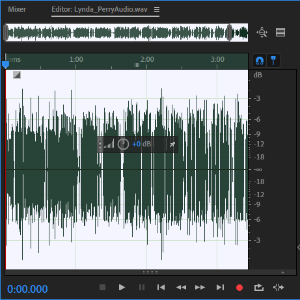
Now, go to the menu bar again. Select Effects > Amplitude and Compression > Fade Envelope (process)...
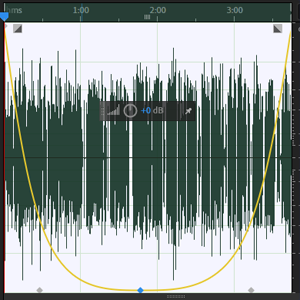
This will bring up a window for Fade Envelope, but will also overlay a "U" shape onto your waveform, shown below. There will also be three nearly-invisible handles, and I've circled them below.
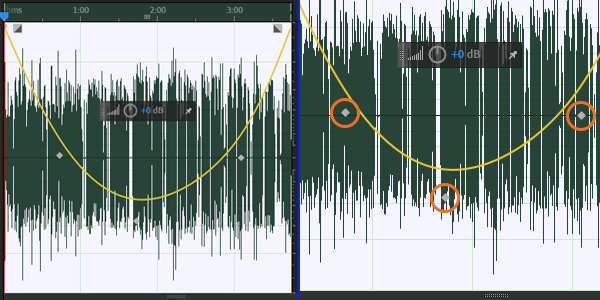
Drag the handles to get the shape below, and then click Apply, and Favorites > Stop Recording Favorite... Give it a descriptive name, like Fade Envelope Silence.
Press Alt + K, which will open your Keyboard Shortcuts dialogue. Then, select the search bar in the lower left of that window, type in your Favorite's name.
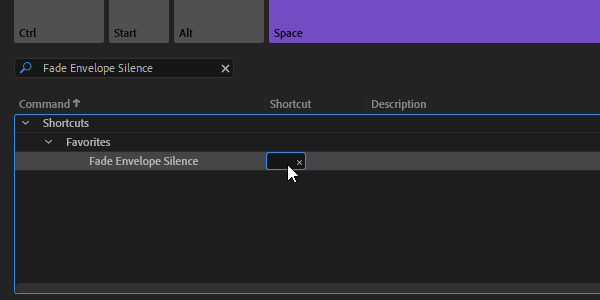
Click the space below Shortcut and to the right of your Favorite, then press an unused key. I'm using F. Afterwards, clicking F will perform the Favorite on whatever you have selected.
1b. Workspace Setup
The next step before we start is to ensure we have the correct panels displayed in our Adobe Audition workspace. The only three that are necessary are Files, Editor, and Markers. If any of these aren't visible, go to Window in the menu bar and enable them.Other panels that are helpful are Selection/View and Levels. Selection/View displays the duration of your selection, plus where it starts and ends within the file's total duration.
2. Marking Your Voice-Over Clips
In order to mark a clip, you click and drag to select a section and press M. Then, in your Markers panel, you'll need to rename your clip. In order to do this, click the clip's name ("Marker 1, Marker 2," etc.) once, then click again about half a second later. If you double-click too fast, it won't work. Once the name is highlighted, type in the clip's title.Continue doing this for all of the clips in the audio file until everything is marked. Remember to save your file frequently with Ctrl + S! When marking your clips, it's a good practice to leave about half a second of silence before and after the clip.
This is because many authoring tools have a tendency to cut off the very beginning or end of audio clips. Therefore, leaving this space will ensure that the entire audio clip is played for the user.
R
3. Exporting Your Clips To Individual Files
Once you are finished, look at your Markers panel again and select all of the clips you've marked and named. Now that they're all selected, click on this little button to export them. It's the fifth from the left in the upper left of the Markers panel, which I have pointed out with an arrow below. A dialog will come up, and there are a few options here.
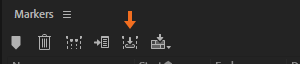
You'll want to check the first option, "Use marker names in filenames," or your efforts in naming every clip will be wasted! "Prefix" allows you to add a static prefix to each exported file's name. Meanwhile, Postfix is for a certain type of postfix—an incremental number. If you put 01 here, for example, the first filename ends with 01, the second with 02, and so on. This can be useful for exporting a large number of clips with directly sequential names.
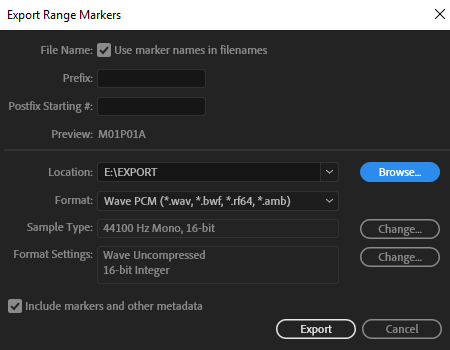
Next, set your export directory to the correct location, then check your file format. Many authoring tools work better with .wav, but all of this will depend on your filesize needs. For our purposes, you can leave the last checkbox checked or unchecked; it won't make a difference here.
We hope this guide helped you with your eLearning course. If you need any help with eLearning and training development, feel free to contact us on our website: http://relate.com/contact.html
This is such a great resource that you are providing and you give it away for free. I love seeing blog that understand the value of providing a quality resource for free. Dubbing
ReplyDelete