Friday, August 17, 2018

"Mics for eLearning" Microphone Reviews

Hi Everyone!


I get a lot of e-mails from people wanting to know about this microphone or that one. There are a wide selection of choices out there and when you're looking to buy a new mic for eLearning voice-over, it can be tough to discern which one would serve your needs best.


Lack of Microphone Reviews for Voice Over


There are tons of mic reviews available on YouTube. But the vast majority of them are targeted to singers and musicians. Reviews specifically for voice-over applications are few and far between in comparison.


Also, unfortunately, many YouTube mic reviews are performed by people who seem to know little or nothing about audio production, causing even some of the best mics out there to sound awful, due to poor vocal technique or a bad setup.


Now I can understand why so many people are having trouble finding an appropriate mic for voice-over — with the over-saturation of reviews and conflicting opinions out there, the process can be downright confusing!


Naturally, We Started Our Own Series!


So, several months ago, we came up with a new series for our eLearnChat show highlighting a variety of mics that are great for eLearning.


In each "Mics for eLearning" review, we:


  • Demonstrate mics with the same voice & under the same studio conditions

  • Go through our list of pros, cons, & suitable applications for the mic

  • Discuss pricing & link to the specific model tested


The playlist on YouTube can be found here:


The videos play in sequence starting with the first review in the playlist. If you'd like to skip forward to a particular mic review, click the drop-down menu in the top left of the embedded player.


As we get new mics, we'll add those to the list in order to keep you up-to-date on the growing selection of good professional mics.


Don't Skimp on Audio Equipment!


NOTE: Though I realize that everyone wants to save money, we are not focusing on the cheap mics which frankly don't sound all that good. Audio quality is important and we want you to have great audio to make your courses engaging and retentive.


Honestly, if you think about it, it's a worthwhile investment. You just can't get the clean, professional sound crucial to eLearning voice-over from a mic that costs less than $100 USD or so.


After all, it's much better to save up to purchase a decent mic that you can actually use with pride than to risk getting stuck with a junker. Why settle for a cheap mic that could harm your reputation with your clients/audience?


What Microphone Brands Are Best?


There are a number of reputable brands that are known for one or several great mics. Here are some mic/audio brands we've reviewed or plan to review:


In the end, the "best" mic for you simply depends on what you plan to use the mic for and how you'd like your voice to sound.


For example, consider someone looking to do a lot of small live seminars. The speaker will need to walk around freely. Also, in a confined space, there's no need for over-the-top amplification. So, an over-the-ear mic with a personal, intimate sound, like the Countryman E6, would be perfect.


On the other hand, a podcaster recording in a studio with a preference for a grittier, more commanding AM radio-like sound might enjoy using the Electro-Voice RE27N/D


Thus, you'll have to think carefully about your needs and let that guide you to your final decision as you watch our reviews.


Need Help with Audio Production?


We're doing our best to include a variety of price ranges and applications in addition to voice-over for eLearning in our microphone reviews. We hope you find the series helpful.


If you have any questions please ask them in the videos or place a comment in the comments area below.


And if you're having trouble with audio production for eLearning or need any other kind of assistance with your Training & Development projects, don't be shy to call us at 1-800-428-3708, send us an e-mail at connect@relate.com, or fill out our contact form. Thanks!

Wednesday, August 8, 2018

Easy Paginated Course Content in iSpring 9 Visuals

iSpring Interactions Icon
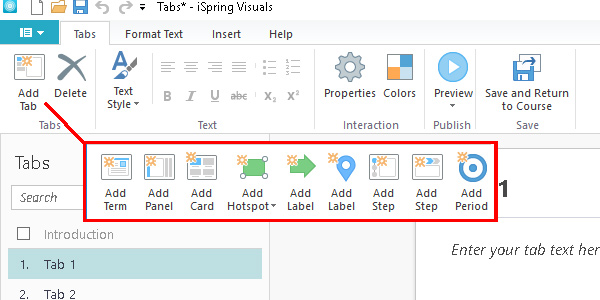
Too much text overwhelms your learners, so today we'll see how iSpring 9 Visuals lets you organize and paginate content.

Certainly, a lot of new ways to do that are available in iSpring Suite 9, using the Visuals editor.

In essence, the Interactions you create in iSpring Visuals can be organized like mini websites. This allows you to include a lot of content that is not only familiar in format, but varied and interesting.

If you're interested in iSpring 9 and its features, we've also done articles on TalkMaster and Cam Pro.

You can either keep reading, or skip ahead to later sections with these links:

Why Use Paginated Content?
How Easy Are Visuals Pages To Make?
Text Editing
How Does Paginated Content Appear In Courses?
Concluding Thoughts


Why Use Paginated Content?


iSpring Visuals Tabs Demo Gif

With iSpring's visuals options such as Tabs, Accordion, Catalogue, Media Catalog, you can fit a lot on a single slide. For eLearning courses, you'll often have a lot of content to fit on each slide, but little space for it.

Check out our demo of iSpring Visuals in order to see some of these features in action.

Therefore, we often struggle to fit everything without boring our learners with big, lifeless blocks of text. Generally, things like pop-ups, fading-in content, and animations help break the monotony.

iSpring Visuals doesn't necessarily replace those, but rather, it adds a lot of easy-to-use options. Thus, with minimal effort, you can create a nice-looking course with plenty of variety.

iSpring Visuals New Interaction Screen

And when I say a lot of options, I mean it. There are 13 iSpring Visuals options at this article's writing and, last I heard, even more are coming.

However, I'll only touch on some of the simpler ones here, including Tabs, Glossary, and Accordion. Rather than going over all of the types in detail, we'll go over some general features.


How Easy Are Visuals Pages To Make?


When you click on the Interaction button, the active slide creates an Interaction object, and the Visuals editor opens. This also creates a corresponding ".visuals" file which contains all of the data for that Interactions object.

You can, therefore, import Visuals slides into other PowerPoint files, if needed. In order to make several similar Visuals slides, you can copy the file and import a copy to another slide.

Once the Interaction object is on your slide, it will look like this, with a small preview of your Interaction.
iSpring Interaction Slide

The actual Visuals editor is easy to learn if you know PowerPoint, because the controls use a similar layout. On the left side, rather than slides, you have whatever subpage type applies to the specific Interaction you're using.

Each Interaction type has its own subpage type, but it's nonetheless intuitive; the button is always in the same place.
iSpring Visuals Different Subpage Types

Once you've chosen your Interaction Type, it's quite simple to start adding tabs, panels, hotspots, and get started! So, let's take a look at how you build these subpages.


Text Editing


Screencap Text Editing Tabs

Above, you can see the text editing interface, which works similarly to something like Microsoft Word. Rather than text boxes which you can move around freely like in PowerPoint, the content automatically aligns and wraps.

Screencap Text Wrapping Options In Visuals
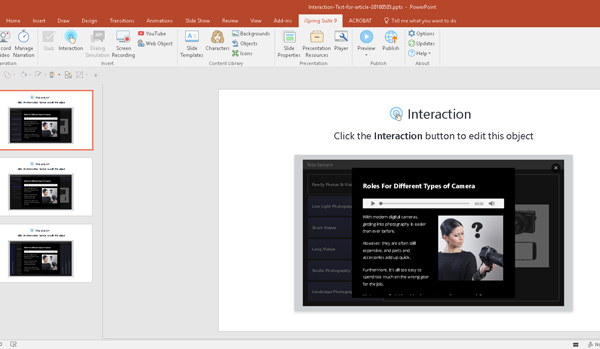
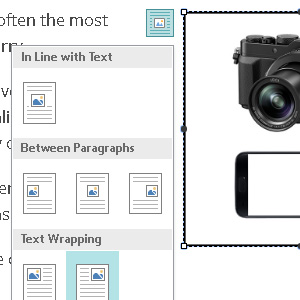
Therefore, inserting images is also similar to Word, where you can align images with paragraphs, selecting how they wrap.

This may be somewhat restrictive, but it's for a good reason; making these pages is very fast and streamlined.

Standard text formatting options are available, such as paragraph alignments and justification, as well as customizable default text styles. Specifically, with the latter, you can set font, size, and use of bold or italic in four different styles.

These styles determine the subpage's title, that is, Item Title, two types of heading, and normal body text.

However, note that these are unique to each Visuals file, not each course or PowerPoint file. In order to re-use styles, you'll need to make a copy of the Visuals file to use as a template.


How Does Paginated Content Appear In Courses?


When you're making an eLearning course, it already has pages and, most likely, plenty of them! Therefore, you may be wondering, "how does pagination within pagination work—won't it be confusing?"

Inside the published course, the main "Next" and "Previous" buttons operate both main slides and subpages of Interaction slides. Therefore, it can work quite seamlessly, eliminating the risk of readers clicking the wrong button.

However, you can change navigation options in the main iSpring PowerPoint plugin. In order to do this, you need to go to the "Player" options on the ribbon.

Screencap Player Icon

Here, in case you need learners to easily access other course pages, you can enable Outline navigation. This allows movement from one slide to any other at any time, unless a restriction is present.

Of course, you'll need such a restriction for most courses, as you won't want users intentionally or accidentally skipping content. In order to do this, you can change navigation options in the aforementioned Player window.

Screencap Playback Navigation Options
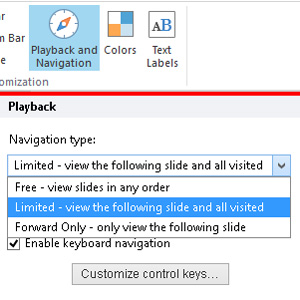
By default, iSpring will add an Outline sidebar to your course, which then allows users to go to any page. However, you have the option to prevent them from accessing pages in the Outline which they haven't visited.

You can see an example of the Outline feature in the demo included in this article.

Access these with the "Playback and Navigation" button, where you can then change the navigation type. This will affect both the Outline feature and the main Next and Back buttons.


Concluding Thoughts


Firstly, for more info on this handy tool and details about its features, check out the in-depth webinar by iSpring themselves!

iSpring Visuals is, similarly to many of the Suite's features, an effort to make interesting and varied content accessible. eLearning pieces are oftentimes a dull affair, as we all know, but not without reason.

Making a course stimulating and interesting to look at takes time, resources, and people, more than many training departments have. Therefore, generously-featured authoring tools like iSpring which emphasize ease and efficiency of use are a potential godsend.

All in all, iSpring Suite is a ambitious and rapidly-growing authoring tool. We at RELATE are quite interested to see where it will go next.

In order to read about other features of the Suite, visit our iSpring articles category. Otherwise, check out the official site.

iSpring Audio Editor: Quick Audio Editing Inside iSpring 9

iSpring Audio Editor IconiSpring Audio Editor came out with Suite version 8, therefore, you may already be familiar with it.

However, we mentioned it in other iSpring 9 articles, so we'll cover how it works inside the Suite and beyond!

Firstly, we'll go over what it's useful for, then where it shows up inside the Suite.

If you'd like to skip forward, use these links:

What Is The Audio Editor For?
What Features Does The Audio Editor Offer?
Where Is The iSpring Audio Editor?
How Do I Use The Audio Editor Outside PowerPoint?


What Is The Audio Editor For?


Because iSpring is an eLearning authoring tool, the Audio Editor specializes in voice-over narration.

Certainly, courses often have a lot of narration in small clips. Therefore, having the ability close at hand to adjust volume, clip out sections, and insert silences is very convenient.

Convenience is the key, since this editor does not intend to replace things like Audition, Sound Forge, GoldWave, et cetera. Rather, like many of iSpring's editing tools, it provides a quick and effective solution for small tasks.


What Features Does The Audio Editor Offer?


This audio editor has a set of tools with a specific purpose in mind, so it's basic but convenient. Therefore, you can quickly tweak and edit VO clips recorded in iSpring with its features.

The two workhorses will likely be Adjust Volume and Remove Noise, thus they are prominent on the ribbon. Adjust Volume, rather than working on decibel levels, uses percent increases and decreases in loudness.

iSpring Audio Editor Controls

It also shows a visual representation of what it's doing to the waveform in real time, which is nice. Of course, if you need clips within specific decibel ranges, you might use another audio editor, but this works well.

Remove Noise is just as easy, since you only need to select a region without speech and click Remove Noise. Then, it asks you to confirm, and removes noise based on that profile.

While experienced users with specialized audio software could remove more, I find it does a fantastic job with no effort.

Other tools are related to cutting and adding silences, such as Silence and Trim.

When you select an area and click Silence, it preserves the selection's length but removes all sound. Trim, on the other hand, cuts out everything but the selection.

Finally, Fade In and Fade Out are suited to making small clips out of imported music. Another situation where these would be useful could be voiceover with intentional ambient sound in the background.

For example, if a character is talking with factory equipment in the background, and you're leaving in those background sounds. Of course, cutting off at the end without any transition will sound bad, so Fade Out would help here.


Where Is The iSpring Audio Editor?


iSpring Record Audio Button
The first way you might come across the editor is when recording slide narration audio. In order to do this, you need to click the "Record Audio" button, the first option in the iSpring tab.

This opens an interface to record audio and, afterwards, you can click Manage Narration to make changes.

If you're bringing in audio from an external file, however, you'd just go to Manage Narration first.

The next place you might encounter it is from within the iSpring Visuals editor. You won't see the Edit Audio interface unless it's relevant, therefore it won't show up unless you use Insert Audio.

You need to insert audio, but afterwards, to get to Edit Audio, find this icon:iSpring Edit Audio Icon

Depending on how you're inserting audio, it shows up in the Sound Recorder interface or the Audio Tools tab.

Check out our video on using the Audio Editor when recording voiceover in Visuals:


iSpring Sound Recorder Interface

The button above appears when you record audio in iSpring Visuals; it opens up the audio editor.
The Audio Tools tab only appears in iSpring Visuals once you've added audio and selected it in the subpage.

iSpring Visuals Audio Tools Tab


How Do I Use The Audio Editor Outside PowerPoint?


Finally, if you want to use the program outside of PowerPoint or the rest of iSpring, use the Start Menu. It will then come up under iSpring Audio-Video Editor 9.

The executable itself installs to \iSpring\Suite 9\bin32\AVEditor.exe in iSpring's installation path. Afterwards, it works much the same way it does from inside the Suite; simply open files and edit them.

Should I Use This Audio Editor?


To summarize, iSpring Audio Editor is a lightweight, convenient audio editor, perfect for small tasks. As I said above, I find it similar to the old Windows Sound Recorder, but geared to voiceover.

For simple jobs like increasing volume, reducing noise, clipping and adding fades, it's a good choice. The program lacks controls for compression rates, audio channels, codecs, and only saves in .wav or .mp3.

Therefore, you might want a beefier audio suite if you need finer control of filesize, mono or stereo channels. Editing is only single-track, as well.

Overall, if you have or plan to get iSpring Suite anyway, I'd recommend trying this program out.

If you want to read more about iSpring, check out our other articles. Also, you can visit the official site.