However, we mentioned it in other iSpring 9 articles, so we'll cover how it works inside the Suite and beyond!
Firstly, we'll go over what it's useful for, then where it shows up inside the Suite.
If you'd like to skip forward, use these links:
What Is The Audio Editor For?
What Features Does The Audio Editor Offer?
Where Is The iSpring Audio Editor?
How Do I Use The Audio Editor Outside PowerPoint?
What Is The Audio Editor For?
Because iSpring is an eLearning authoring tool, the Audio Editor specializes in voice-over narration.
Certainly, courses often have a lot of narration in small clips. Therefore, having the ability close at hand to adjust volume, clip out sections, and insert silences is very convenient.
Convenience is the key, since this editor does not intend to replace things like Audition, Sound Forge, GoldWave, et cetera. Rather, like many of iSpring's editing tools, it provides a quick and effective solution for small tasks.
What Features Does The Audio Editor Offer?
This audio editor has a set of tools with a specific purpose in mind, so it's basic but convenient. Therefore, you can quickly tweak and edit VO clips recorded in iSpring with its features.
The two workhorses will likely be Adjust Volume and Remove Noise, thus they are prominent on the ribbon. Adjust Volume, rather than working on decibel levels, uses percent increases and decreases in loudness.
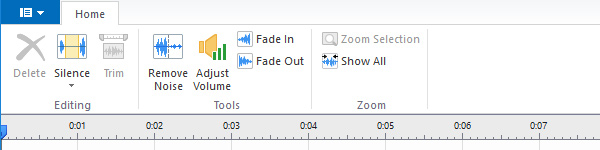
It also shows a visual representation of what it's doing to the waveform in real time, which is nice. Of course, if you need clips within specific decibel ranges, you might use another audio editor, but this works well.
Remove Noise is just as easy, since you only need to select a region without speech and click Remove Noise. Then, it asks you to confirm, and removes noise based on that profile.
While experienced users with specialized audio software could remove more, I find it does a fantastic job with no effort.
Other tools are related to cutting and adding silences, such as Silence and Trim.
When you select an area and click Silence, it preserves the selection's length but removes all sound. Trim, on the other hand, cuts out everything but the selection.
Finally, Fade In and Fade Out are suited to making small clips out of imported music. Another situation where these would be useful could be voiceover with intentional ambient sound in the background.
For example, if a character is talking with factory equipment in the background, and you're leaving in those background sounds. Of course, cutting off at the end without any transition will sound bad, so Fade Out would help here.
Where Is The iSpring Audio Editor?

The first way you might come across the editor is when recording slide narration audio. In order to do this, you need to click the "Record Audio" button, the first option in the iSpring tab.
This opens an interface to record audio and, afterwards, you can click Manage Narration to make changes.
If you're bringing in audio from an external file, however, you'd just go to Manage Narration first.
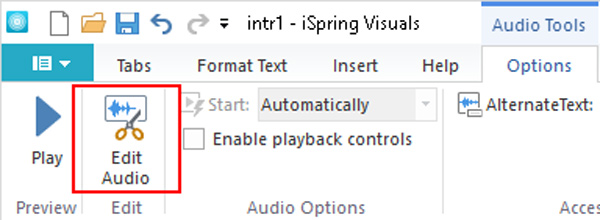
The next place you might encounter it is from within the iSpring Visuals editor. You won't see the Edit Audio interface unless it's relevant, therefore it won't show up unless you use Insert Audio.
You need to insert audio, but afterwards, to get to Edit Audio, find this icon:
Depending on how you're inserting audio, it shows up in the Sound Recorder interface or the Audio Tools tab.
Check out our video on using the Audio Editor when recording voiceover in Visuals:

The button above appears when you record audio in iSpring Visuals; it opens up the audio editor.
The Audio Tools tab only appears in iSpring Visuals once you've added audio and selected it in the subpage.
How Do I Use The Audio Editor Outside PowerPoint?
Finally, if you want to use the program outside of PowerPoint or the rest of iSpring, use the Start Menu. It will then come up under iSpring Audio-Video Editor 9.
The executable itself installs to \iSpring\Suite 9\bin32\AVEditor.exe in iSpring's installation path. Afterwards, it works much the same way it does from inside the Suite; simply open files and edit them.
Should I Use This Audio Editor?
To summarize, iSpring Audio Editor is a lightweight, convenient audio editor, perfect for small tasks. As I said above, I find it similar to the old Windows Sound Recorder, but geared to voiceover.
For simple jobs like increasing volume, reducing noise, clipping and adding fades, it's a good choice. The program lacks controls for compression rates, audio channels, codecs, and only saves in .wav or .mp3.
Therefore, you might want a beefier audio suite if you need finer control of filesize, mono or stereo channels. Editing is only single-track, as well.
Overall, if you have or plan to get iSpring Suite anyway, I'd recommend trying this program out.
If you want to read more about iSpring, check out our other articles. Also, you can visit the official site.
No comments:
Post a Comment