Last week on LIFE Edge, Rick Zanotti interviewed Marc Cameron, author of the Jericho Quinn series. We discussed his books, outdoor life, bikes, and more. Marc is a New York Times-bestselling author known for both his Jericho Quinn series and his books featuring Tom Clancy's Jack Ryan.
Follow this link to watch our interview, or view it below.
How Marc Cameron Started Writing
Marc says, "I started like most writers do, I think. Discovering, mimicking other writers and kind of writing fanfiction before we knew what fanfiction was. I started writing short stories when I was quite young, you know, eight, nine, ten years old, and then slowly morphed into trying to get published."
"I really liked Old Yeller," he recalls. "I grew up in north-central Texas, so I liked books about boys and dogs and horses. Fred Gipson, Wilson Rawls, I devoured all the Hardy Boys books. It probably had a lot to do with why I went into law enforcement later on."
Around the time Marc started writing the Jericho Quinn series, his son joined the Air Force Office of Special Investigations. "Oddly, though," Marc says, "I started writing about OSI agents about the time he was getting in. He wasn't in yet [when] I started the Jericho books."
You can find the Jericho Quinn series on Marc's Amazon author page.
Was Marc Cameron A U.S. Marshal?
Though Marc draws from his experience when creating his stories, he couldn't write about the Marshals at the time.
This is because he was still in the U.S. Marshals, and was forbidden to write about either the Marshals or the Justice Department. Later on, Marc retired from the Marshals to pursue writing full-time. That's why August Bowen, the U.S. Marshal character, doesn't appear until book 4, Time of Attack.
Time of Attack on Amazon
According to Marc, "I like the character of August Bowen, and I think the new series that is out, the Arliss Cutter series, is really kind of a mirror of our August Bowen. In fact, in my mind, I figure that Arliss Cutter and August Bowen probably served in the same unit."
Open Carry on Amazon
Marc's Alaskan Inspiration
Although he's worked across the United States and traveled the world, Marc Cameron is a longtime Alaska resident. Among other reasons, Marc and his wife enjoy the huge outdoor expanses, which allow people to use and hone traditional skills.
"It doesn't take very long to leave civilization behind," Marc says of living in Alaska. "I think there's a lot of value in getting back to our roots, you know? We have a freezer full of meat that we harvested. My wife's a fisherwoman, and we have an entire upright freezer full of her salmon and halibut."
This extends to the U.S. Marshals. "We talk about man-trackers. U.S. Marshals are known for hunting down fugitives, but in certain parts of the United States, we're still tracking, step-by-step kind of tracking. We can't rely on just technology. I think there's a lot of value in that, for our daily lives as well."
Marc Cameron was a police officer in Texas for nearly 7 years, and got into the U.S. Marshals after a 2-year process. He worked in Texas, Idaho, and then 15 years in Alaska. Because there aren't very many Marshals, he explains that a Texas marshal might end up assigned to New York or California.
Marc & Martial Arts: Putting The Fighting Into Writing
Over the course of his law enforcement career, Marc studied aikido and jujitsu. However, his aikido instructor taught him a specialized style of aikido outside of the normal classes. "Since he knew I was in law enforcement," Marc explains, "he would give me extra teaching on the side [and] basically turned my aikido class into aikijujutsu." Marc draws from this and his previous experience fencing to inform the fight scenes in his writing.
Even though the Jericho Quinn books draw from Marc's experience, he says, "Jericho's way tougher than me!" Jericho, like the other characters, is a mix of many people the author has known over the years.
Jericho & His Motorcycle: That Death Dealer Look
Jericho rides the same motorcycle as Marc, his beloved BMW GS 1200.
Marc tells us, "They're very aggressive looking. One of my friends online teaches Krav Maga down in the southeast part of the United States. He's got a bike like that, and he calls it Helga the Schnellpanzer, or something like that. It's just got that kind of a look to it."
Marc likens the bike to the big black horse the Death Dealer sits on in Frank Frazetta's painting. Marc is a fan of Frazetta's work; he says, "I always think that if my books would have been written back in the 70's, I would have liked Frazetta to do the covers. That's the vision I have in my head."
Upcoming Releases & Closing Comments
Marc talks about his upcoming releases. The next two, in November, will be Jericho Quinn's Active Measures and Code of Honor in the Jack Ryan series. After that, Stone Cross, the next Arliss Cutter book, will come out.
On LIFE Edge, we ask all of our guests: "What is it that gives you an edge in life?" Marc considers his edge to be a piece of advice a college professor gave him. During Marc's freshman year in college, his theater drama professor told him, "Marc, you will never amount to your full potential unless you learn to utilize those 15-minute segments of time that other people waste." Marc says, "I really took that to heart. I think a lot of people spend time thinking they don't have enough time to get anything done, so they'll play a game of Angry Birds, or whatever the fashionable game is on their phone today, or just read something on Reddit, being a consumer. I prefer to create instead of consume; I love watching shows and movies and such, but I would much rather put something out for other people to consume. And in order to do that, especially at the pace that I do now, I can't waste time—at all."
You can visit Marc's website for news on his latest books at:https://www.marccameronbooks.com
Recently at RELATE, we were using the Canon 50mm EF f/1.4 USM and Sigma 50mm f/1.4 Art DG lenses with our EOS R and the EF-EOS R adapter. This got us thinking: are the results really that different?
Therefore, we did a small test with portraiture, which is the type of shot we typically use these lenses for. Camera settings were at 1/125 sec. shutter and ISO 1000, while both lenses were at f/1.4. We've heard that the differences between these lenses are most pronounced when wide open.
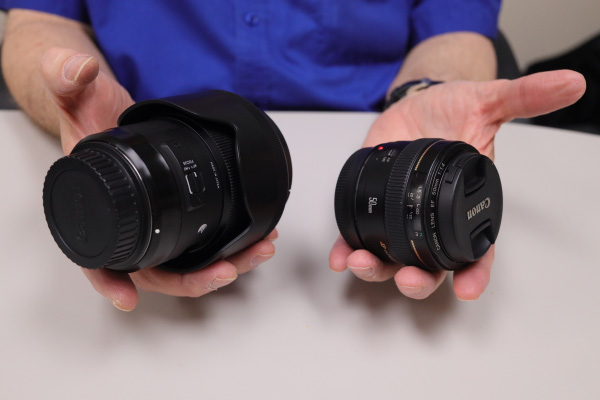
This is because the Canon has 7 lens elements, while the Sigma has 13 lens elements. The Sigma includes an aspherical element, which should reduce spherical aberration when wide open. This is the softness that many lenses suffer at large apertures. However, due to these additional elements, the Sigma is twice the size, thrice the price, and three times the weight.
The Canon 50mm EF f/1.4 USM is around $325-350 USD new, while the Sigma 50mm f/1.4 Art DG is ≈$950 USD new.
Therefore, we'll take a couple photos from each lens and compare:
1. The overall look of the photos.2. Resolution of fine details.3. Chromatic aberration.
Lens Comparison #1: Overall look
Canon 50mm EF f/1.4 USM (click for full resolution)
Sigma 50mm f/1.4 Art DG (click for full resolution)
Canon 50mm EF f/1.4 USM (click for full resolution)
Sigma 50mm f/1.4 Art DG (click for full resolution)
You can click the links in order to view these at full resolution, and I recommend you do so! Towards the center of the frame (which is around Rick's chin) the images are pretty similar. As you move further out, though, the effect of the Sigma's aspherical element allows it to stay sharper. I'll detail this further in the next section, and show some close-ups.
Lens Comparison #2: Resolution of fine details
In this image, I'll start by comparing zooms near the center of the frame. This is where the two should be most similar in terms of fine detail. Again, you can use the links above to see the photos in full resolution, if you prefer.
Canon 50mm EF f/1.4 USM
Sigma 50mm f/1.4 Art DG
As we can see, at the very center of the frame, the lenses are similar, even wide open. Therefore, we'll go a bit further up in the image.
Canon 50mm EF f/1.4 USM
Sigma 50mm f/1.4 Art DG
This is the eye that was slightly further from the camera. Hence, on both images, we're seeing slight blurring due to the extremely shallow depth of field at f/1.4. Still, with the Canon lens we're starting to see the effects of spherical aberration. Here, it manifests as a slight "smearing" of the image. Even so, they're not that far off from each other. The final crop will be much closer to the edge of the photo.
Canon 50mm EF f/1.4 USM
Sigma 50mm f/1.4 Art DG
Here, the difference is most pronounced. On the Sigma shot, the hair towards the foreground is quite sharp, and blurs further back due to shallow DoF. On the Canon lens shot, though, the whole thing is noticeably blurry.
Lens Comparison #3: Chromatic aberration
Our final comparison is chromatic aberration. There are a few points where we'll compare, but this particular type of photo isn't the best to showcase this. This is because there are no objects with sharp edges or a lot of bright points of light. Therefore, this would be more of a concern with still lifes, macro photography, and night shots.
Landscapes and other outdoor photos might have bright points of light and sharp edges, but it's less of a concern there. That's because you'll usually shoot those at smaller apertures, both for deeper DoF and because daylight is so bright.
First, we'll compare the eye highlights.
Canon 50mm EF f/1.4 USM
Sigma 50mm f/1.4 Art DG
Chromatic aberration is probably more evident here than anywhere else in the picture. Even so, it's not obvious. The eye glint looks like a white disc with several faint colored discs slightly overlapping. Separating the channels, I found that in this area of the image, blues shifted lower-left, while reds shifted slightly upwards.
The animations below show this crop in each color channel.
Canon 50mm EF f/1.4 USM
Sigma 50mm f/1.4 Art DG
As you can see, the highlight shifts slightly more on the Canon shot, while the Sigma's highlight stays in place. There is a slight amount of chromatic aberration on the blue channel even with the Sigma, though.
Our next chromatic aberration test is on the edges of shapes. As we mentioned earlier, this will be less noticeable on a portrait. This is because the edges of a face will blur more at a larger aperture. Meanwhile, chromatic aberration is less pronounced at smaller apertures.
Canon 50mm EF f/1.4 USM
Sigma 50mm f/1.4 Art DG
While a slight shift of the green channel is visible in this area of the Canon photo, it's relatively mild. Towards the edges of the picture, spherical aberration dwarfs the chromatic aberration effect, so it's harder to tell how pronounced it is.
Therefore, I don't think the difference in chromatic aberration will be a major problem for the majority of photo types. Only specific types of shots would highlight the difference here. For example, if you photographed a stark black-and-white polka dot pattern wide open, it may become noticeable.
After all these tests, we come back to the question: is the difference noticeable? Although I didn't notice much difference at first, after closer examination, it's somewhat obvious. However, keep in mind that these were shot at conditions where an aspherical lens element would make significant difference. At smaller aperture values, the differences between the lenses become less and less pronounced.
Overall, your best bet is to compare these lenses and their potential differences against your needs. Do you shoot at large apertures often, and are fine details and sharp edges all throughout the frame essential? If so, does this outweigh the big differences in price, weight, and size?
If you often travel with your camera, weight and size could be a major consideration. One lens is slightly over half a pound, the other is nearly two, the Canon at 290g and Sigma at 815g.
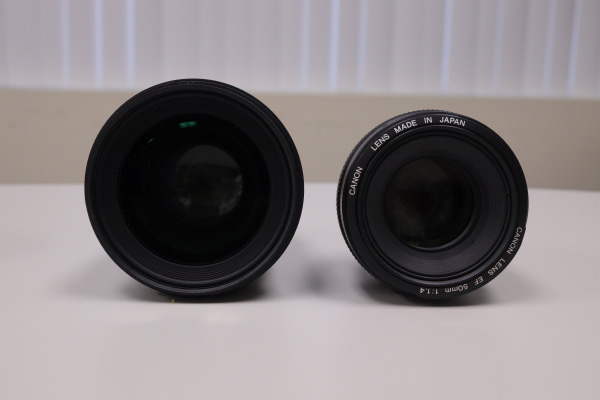
Note the difference in size of each lens' front element.
In terms of dimensions, the Canon is 2.9" x 2" dia. or 73.8mm x 50.5mm dia. Meanwhile, the Sigma is 3.9" x 3.4" dia. or 99.9mm x 85.4mm dia. This means that the Canon lens takes three-quarters of the volume in your camera bag. This doesn't include lens hoods. The Canon 50mm doesn't come with a lens hood, while the Sigma does. While hoods add bulk to your kit, they're a good idea if you're going traveling. Of course, lens flares can be quite trendy in photography nowadays when used consciously!
We tend to take the Canon lens on trips, but the Sigma is an excellent studio lens with crisp resolution of details.
Hopefully this article, though somewhat limited in scope, was helpful to you!
If you found it useful, you can find my other articles on photography and design here.For our articles on photography topics only, follow this link.
When creating an eLearning course, you need all the help you can get in making the material engaging and interesting. Voice-over is a common tool used towards this end. However, editing voice-over clips is a potentially time-consuming process. You could have hundreds or even thousands of clips for a single course.
If you don't have an efficient workflow, this could consume many hours and push your project well outside of scope. Fortunately, modern audio editing software offers features that make this a quick and very straightforward job.
Although similar editing workflows exist in all modern audio editing suites, we'll cover Adobe Audition, because it's so commonly-used. If you're using another program, the terminology will be similar, but the exact keyboard shortcuts will vary. Therefore, if you're using another, you'll need to look up the terms in your editing suite's hotkey reference.
Also, for the purposes of this article, I am using Windows 10; some details may vary if you're on Mac or Linux.
You can jump to later parts of the article using these links:
First, we're going to cover what this article is assuming you have.
1. What You Need Before Editing Voice-Over
In order to know where to cut your audio clips and name them properly, you'll need the script for your eLearning piece on hand. You'll need a standardized naming convention for audio clips, too. Otherwise, your developers will have trouble knowing what to put where. Or, if you're doing the development, you may forget what goes where by the time you need to insert the audio!
The format we'll use here is module, page, element. For example, M05P11G would indicate course module 5, page 11, element G, which corresponds to the format in our script.
You'll then need the raw audio file. For the purposes of this article, we will mark, cut, add silence, and reduce volume on certain sections. In practice, you will probably end up using Amplify and other processing techniques to get the volume and qualities you want. For now, though, we'll keep it simple.
Always keep an unaltered original version of your raw audio file. This way, if you make a mistake and accidentally save it, you can start over. Ideally, you'll keep your copy for editing in a different folder than the original to minimize accidental modifications.
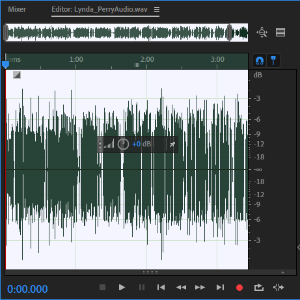
Now, bring the copy of the file you'll use for editing into Audition. Drag it into the "Files" panel, like so:
As you can see, doing this creates a .pkf in the same directory as your file, which is a "peak file." This is generated by Audition and is needed in order to render the clip's waveform in the Editor view. Here is what the waveform looks like in that Editor panel:
The next two steps are optional, and you may not need them if you've already set Audition to your needs. Therefore, if that's the case, you can skip to "Marking Your Voice-Over Clips."
1a. Adding a "Silence" Shortcut
If you already have a preexisting shortcut that you prefer to use when silencing sections of audio, you can skip this section. We're going to set up a shortcut to silence using a Fade Envelope, but first I'll explain why that's helpful.
Sometimes, you'll want to remove a part of the audio clip, but you want the time it occupies to remain. A cough or breath, for example, may need to be removed, but you find that simply deleting it makes the sentence sound awkward.
If there is background noise in your recording, silencing it may also sound abrupt, because the noise is silenced too.
In this case, fading out at the start of your selection and fading back in at the end is ideal. This is what Fade Envelope will do for us. In order to make a shortcut for this, we'll need to record a "Favorite."
The first thing we'll need to do is Select All, so click on your waveform and hit Ctrl + A. Your waveform should become highlighted, like this:
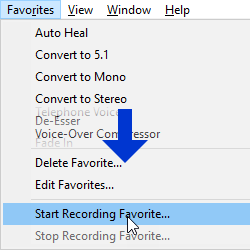
Next, go to the menu bar and click Favorites, then click an option near the bottom called "Start Recording Favorite."
This will save all of your actions inside Audition until you stop recording.
This handy feature can save you thousands of menu clicks, which would otherwise add up to a lot of wasted time.
Now, go to the menu bar again. Select Effects > Amplitude and Compression > Fade Envelope (process)...
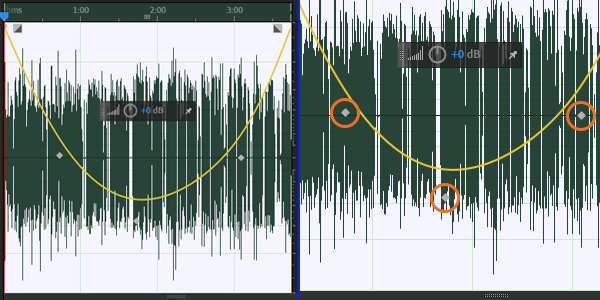
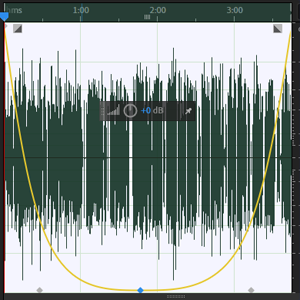
This will bring up a window for Fade Envelope, but will also overlay a "U" shape onto your waveform, shown below. There will also be three nearly-invisible handles, and I've circled them below.
Drag the handles to get the shape below, and then click Apply, and Favorites > Stop Recording Favorite... Give it a descriptive name, like Fade Envelope Silence.
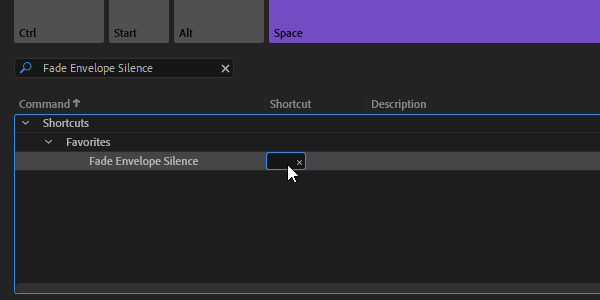
Press Alt + K, which will open your Keyboard Shortcuts dialogue. Then, select the search bar in the lower left of that window, type in your Favorite's name.
Click the space below Shortcut and to the right of your Favorite, then press an unused key. I'm using F. Afterwards, clicking F will perform the Favorite on whatever you have selected.
1b. Workspace Setup
The next step before we start is to ensure we have the correct panels displayed in our Adobe Audition workspace. The only three that are necessary are Files, Editor, and Markers. If any of these aren't visible, go to Window in the menu bar and enable them.
Other panels that are helpful are Selection/View and Levels. Selection/View displays the duration of your selection, plus where it starts and ends within the file's total duration.
2. Marking Your Voice-Over Clips
In order to mark a clip, you click and drag to select a section and press M. Then, in your Markers panel, you'll need to rename your clip. In order to do this, click the clip's name ("Marker 1, Marker 2," etc.) once, then click again about half a second later. If you double-click too fast, it won't work. Once the name is highlighted, type in the clip's title.
Continue doing this for all of the clips in the audio file until everything is marked. Remember to save your file frequently with Ctrl + S! When marking your clips, it's a good practice to leave about half a second of silence before and after the clip.
This is because many authoring tools have a tendency to cut off the very beginning or end of audio clips. Therefore, leaving this space will ensure that the entire audio clip is played for the user.
R
3. Exporting Your Clips To Individual Files
Once you are finished, look at your Markers panel again and select all of the clips you've marked and named. Now that they're all selected, click on this little button
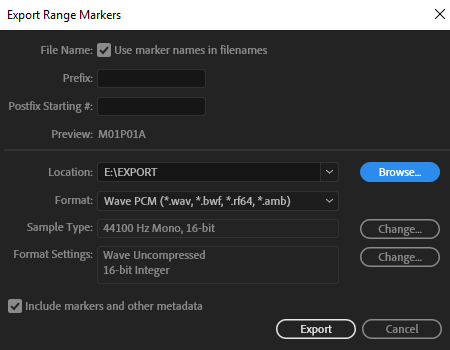
to export them. It's the fifth from the left in the upper left of the Markers panel, which I have pointed out with an arrow below. A dialog will come up, and there are a few options here.
You'll want to check the first option, "Use marker names in filenames," or your efforts in naming every clip will be wasted! "Prefix" allows you to add a static prefix to each exported file's name. Meanwhile, Postfix is for a certain type of postfix—an incremental number. If you put 01 here, for example, the first filename ends with 01, the second with 02, and so on. This can be useful for exporting a large number of clips with directly sequential names.
Next, set your export directory to the correct location, then check your file format. Many authoring tools work better with .wav, but all of this will depend on your filesize needs. For our purposes, you can leave the last checkbox checked or unchecked; it won't make a difference here.
We hope this guide helped you with your eLearning course. If you need any help with eLearning and training development, feel free to contact us on our website: http://relate.com/contact.html
iSpring Flip 9, a newly-released feature of iSpring Suite 9, can quickly turn a PDF, Word, or Powerpoint
file into an eBook.
You can display one or two pages at one time, show
thumbnails for page navigation, display in full screen, and zoom in or zoom
out. You can put in hyperlinks to external sites, as well as internal ones, such
as a table of contents.
If you want to see an example of tracking/scoring progress on an eBook, see below for a screen shot of a Scorm 1.2 score of a Word
doc. Note that the Score in the learning management system is NOT a pass/fail score,
but the completion of the eBook. For example, in a 10-page eBook, if you have
read 5 pages, you will show a 50% “Score.”
iSpring Flip 9 is available as part of iSpring Suite 9, or it can also be purchased by itself as a standalone application. You can learn more about it and even try it for yourself by downloading a free 14-day trial of Suite 9 here https://www.ispringsolutions.com/ispring-flip
About Leslie Zanotti
Leslie Zanotti is the Vice President of Relate Corporation, a well-known Training & Development company specializing in eLearning, media production, and Internet broadcasting.
Need Help?
If you need assistance on your eLearning development projects, seek professional development services including corporate video and audio production, want some management consulting, or just need some help, send us a note on our contact form, e-mail us at connect@relate.com, or call us at 800-428-3708. Thanks for reading!
Join us for a look at the Adobe Captivate interactive video element, new to Adobe Captivate 2019.
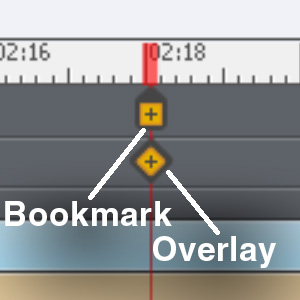
Interactive Video allows you to present a video, either from a file or YouTube, and define bookmarks and Overlay slides. You can jump to Bookmarks with Actions, while Overlays pause the video and show another slide on top.
Buttons can jump to a Bookmark, whether it's on a different slide or the same one. Meanwhile, Overlays let you pause the video and show a lot of content on top of the video, if needed.
An Overlay is contained in its own slide, which is initiated by an Overlay timeline item on the main slide. Therefore, it's super easy to move an Overlay around on the timeline.
Sample Demonstration of Interactive Video
Follow the link below and view our Interactive Video demo in order to get an up-close look at these features!
When using Interactive Video, you may run into a problem we did: white flashes between Interactive Video slides. There are two things to watch out for here: Slide Transitions and background colors.
If you use, for example, a Fade transition on a slide with Interactive video, it tends to fade from white. Likewise, if either your Master Slide or Slide Color are white, it will flash white.
Of course, this can be jarring if your video has a dark background. If you still need to use a Fade transition, you'll want to make sure that:
1. The Slide Color is set similarly to your video's background. When you're on the slide with nothing more specific selected, Slide Color shows in your right Properties bar.
2. The Master Slide color is set similarly to the video background. In order to change this, go to Themes on the top. Specifically, Themes > Master Slide, then Slide Color in Properties on the right.
3. Finally, in Edit > Preferences > Defaults, the Background Color is set to the same color as the others.
Generally, it's a good idea to set these in projects that are heavy on the Interactive Video elements. Besides transitions, you'll also see a flash of background color when jumping back to an earlier slide.
When jumping to Interactive Video Bookmarks from a different slide, they first flash a single frame from the target video. It can be a bit jarring, but we haven't yet found a workaround for it.
The frame it shows is pulled from around the middle of the video, similarly to a YouTube thumbnail. This is what Captivate uses in order to display the video when it's not loading the whole thing.
For example, it uses this frame as the thumbnail for Filmstrip view on the left.
Despite these few "gotcha"s, Interactive Video is a useful new feature that makes creating, well, interactive video, easy in Captivate!
We'd love to hear your comments, corrections, and questions in the comments below!
Recently, we did a Tech Down Over episode on some new softboxes we purchased for our studio at RELATE. Here, we'll recap what we talked about on the show, and go a little deeper into these light modifiers.
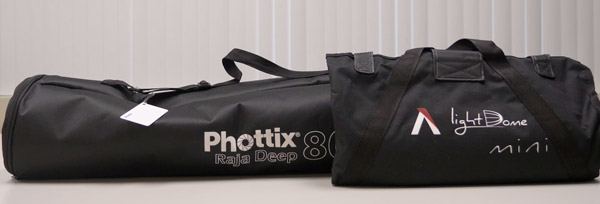
In order to get more out of our Aputure c120d and Aputure c120d ii, we got some new softboxes. These are the Aputure Light Dome Mini I and the Phottix Raja Deep 80, which we're comparing with our Aputure Light Dome I.
Raja Deep & Mini Dome in their carrying cases.
Note, however, that these light modifiers use the Bowens Speedring standard and will work with any light featuring that mount.
Our tests will take a look at ease of setup, how they affect the light's brightness, and then light softness.
How Easy Are These Softboxes To Set Up?
We mainly use these in our studio, therefore, we don't need to take them apart too often. If you're bringing these with you on a shoot, this could be a big factor in which you prefer, though.
However, even if we didn't take apart the Light Dome I very often, setup was our biggest gripe with it.
You need to bend the dome's 16 rods and then fit them into the corresponding slots. This takes longer than necessary, besides which the force required makes me think I'm about to break the dome!
The Light Dome I's Bowens speedring and poles.
As I understand, the Light Dome II has improved on this, but we couldn't get it at the time. This was because of an issue involving CA Proposition 65 and some of the materials in the dome.
The Mini II was also facing this issue. Therefore, we got the Light Dome Mini I and the Phottix Raja Deep 80.
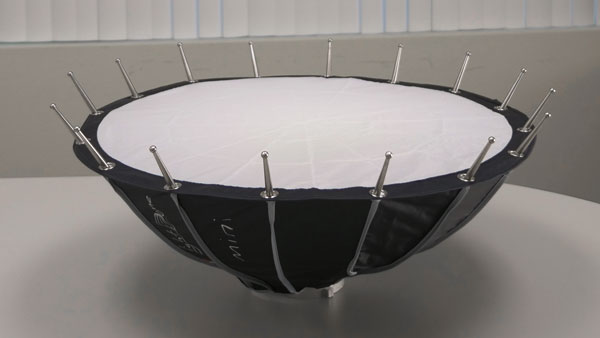
The Mini I has a similar setup to the Light Dome I, but it was easier to assemble. Mostly, this was because it's a lot smaller. It's also a lot flatter, which means you have to bend the poles less to get them into the slots. Overall, I didn't feel like I was going to rip the dome or break the poles, and that's a plus!
The Light Dome Mini's shape makes for easier setup.
Finally, the Raja was extremely fast to setup. This was because it uses an umbrella-like mechanism that allows for very quick dome expansion:
As you can see, it only takes a few seconds to expand this thing.
How Does Each Softbox Affect Light Intensity?
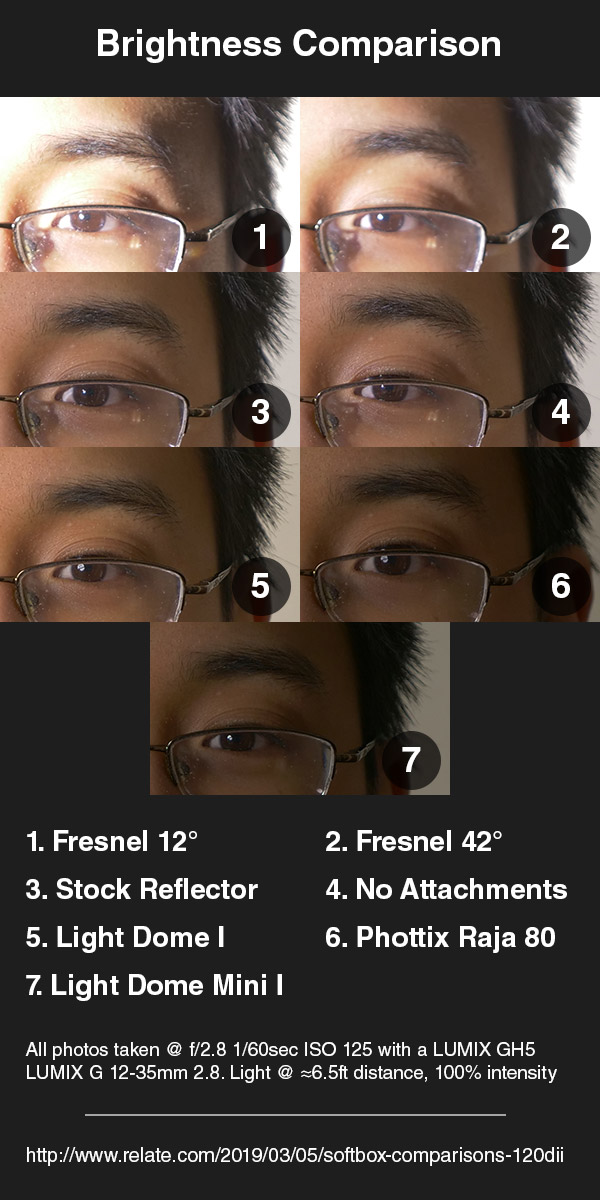
Because the diffusers and reflectors used in these softboxes aren't 100% efficient (naturally!), they reduce the light on your subject. Therefore, we've put together a comparison that should give you an idea of just how much they'll dim your light.
These photos are exposed for the light with no attachments at 100% brightness. Therefore, light focusers like the Fresnel lens overexpose the image, and the softboxes underexpose them.
This basically went as I expected. The Fresnel at its longest focal length created the most intense light, while the Light Dome Mini dimmed the most. This is because the Light Dome Mini spread the light so much. Out of the softboxes, the Light Dome I gave the brightest light.
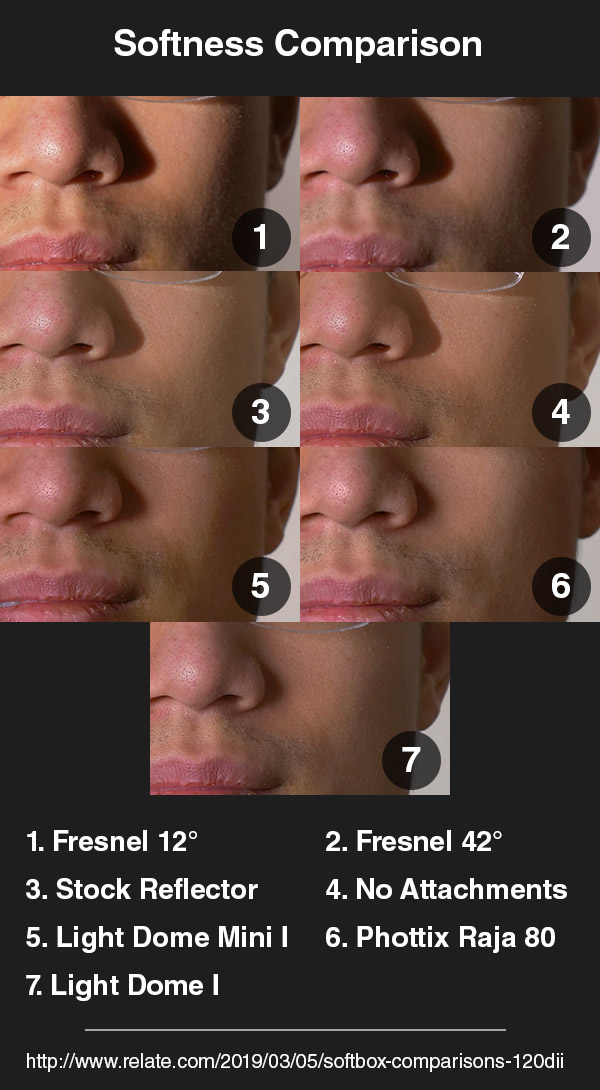
How Much Does Each Softbox Soften The Light?
I expected the light focusing Fresnel lens to create harder shadows than the softboxes and light without attachment. This matched my tests, but the rest of the results surprised me a little.
When compared to the light with no attachment or the stock metal reflector, the softboxes create softer lighting.
However, the difference between these and the light without modifiers was not as much as I'd expected. I may have had the light too far from me. Still, on the larger softboxes, the front of each was only about 3 feet from my face.
With the softboxes, the shadow of my nose is noticeably softer. However, my cheek and the skin texture (which looks rougher with harder lighting) looks about the same. Also, the highlights were about the same.
While I was doing the test, the Raja seemed to offer the softest light. Reviewing these photos, though, it looks like the Light Dome I came out on top.
Which Softbox Is The Best?
In the brightness and softness tests, the Aputure Light Dome I excelled. However, the setup is a beast and a half. Further, it's more expensive than the other two, at about $150 USD.
The Light Dome II combines the poles and speedring for quicker setup, so it may be a more appealing option. But at the time of this article's writing, its availability is limited, especially in California. It also costs more, from what I understand, though none of the retailers we regularly use carry it yet.
Meanwhile, the Light Dome Mini I gives light that's almost as soft as its big brother, and is cheaper, at $100USD. The main draws, though, are the much more portable size and easier setup. It would be much more practical to try and bring this on a shoot. Still, do remember that this knocks out a lot of your light's intensity—you'll need to adjust accordingly.
Finally, the Raja casts light that is comparable to the Light Dome I at a lower price with super-simple setup. The version we bought was about $120 USD, but the setup time taking mere seconds was the biggest draw.
The version we got, the Phottix Raja Deep 80 (referring to its 80cm/31.5in overall length) is quite big. However, it comes in a lot of different sizes and shapes. It comes in both a normal (shallower) profile and the Deep, like what we bought.
Again, it lets out slightly less light than the Aputure Light Dome I, so you'll need to take that into account.
To summarize:
Price: #1: Aputure Light Dome Mini I: $100 #2: Phottix Raja Deep 80: $120 #3: Aputure Light Dome I: $150
Ease of Setup #1: Phottix Raja Deep 80 #2: Aputure Light Dome Mini I #3: Aputure Light Dome I
Brightness #1: Aputure Light Dome I #2: Phottix Raja Deep 80 #3: Aputure Light Dome Mini I
Softness #1: Aputure Light Dome I #2: Phottix Raja Deep 80 #3: Aputure Light Dome Mini I
Of course, these are just the softboxes that we decided to get—they aren't direct equivalents. Still, we hope that this information helped you, whether you decided to get a certain softbox, another modifier, or none at all!
If there's another test you'd like to see us do with these, or if you have other thoughts on lighting, let us know in the comments below!
For several months now at Relate Corporation / RelateCasts, we have been collecting all our blog articles and video podcast shows from each month into an e-mail newsletter.
However, starting now, we will instead post a monthly "Relate Roundup" blog post to showcase our latest media content.
Why the Switch?
We're switching to monthly blog posts because we want to have our monthly summaries available in a more readily-searchable form. We also would like to have more control over the format/layout than is possible with a newsletter.
If you're on our e-mail list and still prefer to be notified of new content via e-mail, don't worry! We'll still be sending out a link to the monthly Relate Roundup to our e-mail list (click here to sign up.)
So, without further ado, let's dig into the Relate Roundup October 2018! Read on to see our October summary and browse through this month's content. Or you can use the links below to jump ahead to your favorite RelateCasts series, guest, or topic:
October Summary: Captivate 2019 + Tech Reviews Galore
We conducted interviews with 10 amazing guests on our video podcasts this month.
One of these was Joe Ganci (eLearning Joe), who visited us in Camarillo for a special in-studio episode of eLearnChat!
A hot eLearnChat topic in October was Adobe Captivate 2019, with both Joe Ganci and Dr. Pooja Jaisingh discussing/demoing the authoring tool's newest features on the show.
On our "Tech Down Over" series, in addition to our usual interview episodes, we put out a ton of bonus content. This included reviews, comparison videos, and opinion pieces on camera gear. In particular, we focused on the Panasonic GH5 and our brand-new Canon EOS-R.
Due to scheduling conflicts, we only had one Life Edge interview this month. But boy, was it a blast! We finally had our Life Edge co-host Dr. Susan Nash (virtually) meet our good friend Gina Schreck of Social KNX, and we all had a lively discussion about staying ahead on social media.
eLearnChat Videos from October
Who did we interview in October for eLearnChat, our popular eLearning interview series? Click on the thumbnail images to watch the videos:
Margie Meacham (Learningtogo)
Margie Meacham of Learningtogo spoke with us about how discoveries in neuroscience inform the development of chatbots & other applications of AI that are quickly gaining popularity in L&D.
https://youtu.be/M74j7nlETgM
Dr. Pooja Jaisingh (Adobe)
Dr. Pooja Jaisingh walks us through a demo of the two major updates in Adobe Captivate 2019: a brand new virtual reality suite & improved interactive video tools. Is Adobe's new focus on ease & efficiency of use paying off?
https://youtu.be/ZYsA5B5PnPs
Dr. Stella Lee (Paradox Learning, Inc.)
Dr. Stella Lee of Paradox Learning joins special co-host Lisa Goldstein to discuss the ethical concerns of artificial intelligence use in L&D. Dr. Lee also shares tips on getting started and thriving in eLearning consulting.
https://youtu.be/jFCWQ9nVvlY
Joe Ganci (eLearning Joe)
See our in-studio interview with Joe Ganci, President of eLearning Joe! Rick & Joe reflect on how instructional design & eLearning as a whole have evolved over time. Also, hear Joe's predictions for the future of the eLearning industry.
https://youtu.be/A-he9BQvxaQ
Ajay Pangarkar (CentralKnowledge)
Ajay Pangarkar, CEO of CentralKnowledge, joins us for an intriguing discussion with Lesley Price of Learn Appeal about the importance of understanding business and finance as a Learning and Development professional.
https://youtu.be/pBdl2BqOXko
Tech Down Over Videos from October
In October, we interviewed 4 guests, did 4 reviews, and made our voices heard with 2 opinion pieces. Click the images to watch the videos.
Emily Lowrey (Micro Four Nerds)
We talk with Emily Lowrey of Micro Four Nerds about our favorite micro four thirds cameras, including the Panasonic G9 & GH5. We also swap opinions with Emily on the newly-announced full-frame mirrorless cameras & the rigors of wedding photography.
https://youtu.be/mPugbbAygQc
Tom Antos (Tom Antos Films)
Director & cinematographer Tom Antos joins us for his 2nd TDO interview! He explains why it's best to balance your film budget over various aspects of production rather than spending it all on the latest gear & shares what he loves best about working in film.
https://youtu.be/Ulc9tcCBIfU
Pete Fox (Westcott)
Pete Fox, Westcott Technical Representative & Product Specialist, tells us all about Westcott's innovative new products, such as the company's new Cine Flex LED mats and Rapid Box line of softboxes. We also discuss the how-to's of lighting for photography and video.
https://youtu.be/6DMk9uAnRiA
Sam Seavey (The Blind Life)
We speak with Sam Seavey of The Blind Life about assistive technology and new emerging tech for the visually impaired. Rick & Sam also share their personal experiences of living with partial blindness.
https://youtu.be/-B43XkaeOs8
Are Dual Card Slots Necessary?
A lack of dual card slots for video cameras has become a common gripe among consumers. But we think, depending on your setup, you may not even need this feature.
https://youtu.be/1sLiKOZk-uQ
Canon XF405 Vs. Panasonic GH5
We compare the Canon XF405 and the Panasonic GH5! Hear our take and see for yourself the differences in focus and recording features, dynamic range, white balance, and more. We also discuss how to properly handle shooting a wide range of skin tones in the same frame.
https://youtu.be/l4H9awolcMg
Sigma 1.4 50mm & Leica Nocticron 1.2 42.5mm
We compare two lenses on our Panasonic GH5 - the Sigma f/1.4 50mm (using a Metabones adapter) and the LUMIX Leica f/1.2 42.5mm. Observe the results and see what you think - which one works better?
https://youtu.be/DX7xcZueosM
Canon EOS First Impressions
Rick & Harold do a brief demo of the Canon EOS R, the brand's new full frame mirrorless camera, and give their initial thoughts. Find out what impressed us, which features we found lacking, and try out our handy tips for efficiently using the menus!
https://youtu.be/tUJdAI_9M4M
YouTube Ad Rant
We're not fans of video ads that pop up right in the middle of a video. We argue that it's a bad practice - for viewers, for content creators, and even for advertisers. What's your take?
https://youtu.be/-xo3xgE01XU
Canon EOS-R Vs. Panasonic G9
We compare the Canon EOS R full-frame mirrorless to the Panasonic G9 micro four thirds mirrorless camera by shooting a series of photos and videos under identical conditions. You might be surprised at how close in quality the results are!
https://youtu.be/g2G3KQ7PtsU
Life Edge for October: Gina Schreck (SocialKNX)
Gina Schreck, founder and CEO of SocialKNX, a top digital marketing firm, gives her time-tested tips for rising above the crowd on social media while staying true to your company's message.
https://youtu.be/VkrSLozZ-T8
Relate Roundup October 2018: Thoughts?
That's it for our content roundup for this month! Did you enjoy the shows? Is there anything in particular that you'd like to see in a future video?
Let us know your thoughts in the comments - we'd love to see you join the conversation.
Need Help? Contact Us!
Relate Corporation is a well-established digital learning/training & media production company based in Camarillo, CA. RelateCasts is our broadcasting division.
If you need help with media production for eLearning or need any other kind of assistance with your Training & Development projects, fill out our contact form, shoot us an e-mail at connect@relate.com, or call us at 800-428-3708 to learn more about our services.
 Last week on LIFE Edge, Rick Zanotti interviewed Marc Cameron, author of the Jericho Quinn series. We discussed his books, outdoor life, bikes, and more. Marc is a New York Times-bestselling author known for both his Jericho Quinn series and his books featuring Tom Clancy's Jack Ryan.
Follow this link to watch our interview, or view it below.
Last week on LIFE Edge, Rick Zanotti interviewed Marc Cameron, author of the Jericho Quinn series. We discussed his books, outdoor life, bikes, and more. Marc is a New York Times-bestselling author known for both his Jericho Quinn series and his books featuring Tom Clancy's Jack Ryan.
Follow this link to watch our interview, or view it below.
 You can find the Jericho Quinn series on Marc's Amazon author page.
 Time of Attack on Amazon
According to Marc, "I like the character of August Bowen, and I think the new series that is out, the Arliss Cutter series, is really kind of a mirror of our August Bowen. In fact, in my mind, I figure that Arliss Cutter and August Bowen probably served in the same unit."
Time of Attack on Amazon
According to Marc, "I like the character of August Bowen, and I think the new series that is out, the Arliss Cutter series, is really kind of a mirror of our August Bowen. In fact, in my mind, I figure that Arliss Cutter and August Bowen probably served in the same unit."
 Open Carry on Amazon
 On LIFE Edge, we ask all of our guests: "What is it that gives you an edge in life?" Marc considers his edge to be a piece of advice a college professor gave him. During Marc's freshman year in college, his theater drama professor told him, "Marc, you will never amount to your full potential unless you learn to utilize those 15-minute segments of time that other people waste." Marc says, "I really took that to heart. I think a lot of people spend time thinking they don't have enough time to get anything done, so they'll play a game of Angry Birds, or whatever the fashionable game is on their phone today, or just read something on Reddit, being a consumer. I prefer to create instead of consume; I love watching shows and movies and such, but I would much rather put something out for other people to consume. And in order to do that, especially at the pace that I do now, I can't waste time—at all."
You can visit Marc's website for news on his latest books at:https://www.marccameronbooks.com
On LIFE Edge, we ask all of our guests: "What is it that gives you an edge in life?" Marc considers his edge to be a piece of advice a college professor gave him. During Marc's freshman year in college, his theater drama professor told him, "Marc, you will never amount to your full potential unless you learn to utilize those 15-minute segments of time that other people waste." Marc says, "I really took that to heart. I think a lot of people spend time thinking they don't have enough time to get anything done, so they'll play a game of Angry Birds, or whatever the fashionable game is on their phone today, or just read something on Reddit, being a consumer. I prefer to create instead of consume; I love watching shows and movies and such, but I would much rather put something out for other people to consume. And in order to do that, especially at the pace that I do now, I can't waste time—at all."
You can visit Marc's website for news on his latest books at:https://www.marccameronbooks.com
 Recently at RELATE, we were using the Canon 50mm EF f/1.4 USM and Sigma 50mm f/1.4 Art DG lenses with our EOS R and the EF-EOS R adapter. This got us thinking: are the results really that different?
Therefore, we did a small test with portraiture, which is the type of shot we typically use these lenses for. Camera settings were at 1/125 sec. shutter and ISO 1000, while both lenses were at f/1.4. We've heard that the differences between these lenses are most pronounced when wide open.
This is because the Canon has 7 lens elements, while the Sigma has 13 lens elements. The Sigma includes an aspherical element, which should reduce spherical aberration when wide open. This is the softness that many lenses suffer at large apertures. However, due to these additional elements, the Sigma is twice the size, thrice the price, and three times the weight.
Recently at RELATE, we were using the Canon 50mm EF f/1.4 USM and Sigma 50mm f/1.4 Art DG lenses with our EOS R and the EF-EOS R adapter. This got us thinking: are the results really that different?
Therefore, we did a small test with portraiture, which is the type of shot we typically use these lenses for. Camera settings were at 1/125 sec. shutter and ISO 1000, while both lenses were at f/1.4. We've heard that the differences between these lenses are most pronounced when wide open.
This is because the Canon has 7 lens elements, while the Sigma has 13 lens elements. The Sigma includes an aspherical element, which should reduce spherical aberration when wide open. This is the softness that many lenses suffer at large apertures. However, due to these additional elements, the Sigma is twice the size, thrice the price, and three times the weight.
 The Canon 50mm EF f/1.4 USM is around $325-350 USD new, while the Sigma 50mm f/1.4 Art DG is ≈$950 USD new.
Therefore, we'll take a couple photos from each lens and compare:
The Canon 50mm EF f/1.4 USM is around $325-350 USD new, while the Sigma 50mm f/1.4 Art DG is ≈$950 USD new.
Therefore, we'll take a couple photos from each lens and compare:
 Canon 50mm EF f/1.4 USM
  Sigma 50mm f/1.4 Art DG
  Canon 50mm EF f/1.4 USM
  Sigma 50mm f/1.4 Art DG
  Canon 50mm EF f/1.4 USM
 Sigma 50mm f/1.4 Art DG
As we can see, at the very center of the frame, the lenses are similar, even wide open. Therefore, we'll go a bit further up in the image.
Sigma 50mm f/1.4 Art DG
As we can see, at the very center of the frame, the lenses are similar, even wide open. Therefore, we'll go a bit further up in the image.
 Canon 50mm EF f/1.4 USM
 Sigma 50mm f/1.4 Art DG
This is the eye that was slightly further from the camera. Hence, on both images, we're seeing slight blurring due to the extremely shallow depth of field at f/1.4. Still, with the Canon lens we're starting to see the effects of spherical aberration. Here, it manifests as a slight "smearing" of the image. Even so, they're not that far off from each other. The final crop will be much closer to the edge of the photo.
Sigma 50mm f/1.4 Art DG
This is the eye that was slightly further from the camera. Hence, on both images, we're seeing slight blurring due to the extremely shallow depth of field at f/1.4. Still, with the Canon lens we're starting to see the effects of spherical aberration. Here, it manifests as a slight "smearing" of the image. Even so, they're not that far off from each other. The final crop will be much closer to the edge of the photo.
 Canon 50mm EF f/1.4 USM
 Sigma 50mm f/1.4 Art DG
Here, the difference is most pronounced. On the Sigma shot, the hair towards the foreground is quite sharp, and blurs further back due to shallow DoF. On the Canon lens shot, though, the whole thing is noticeably blurry.
Sigma 50mm f/1.4 Art DG
Here, the difference is most pronounced. On the Sigma shot, the hair towards the foreground is quite sharp, and blurs further back due to shallow DoF. On the Canon lens shot, though, the whole thing is noticeably blurry.
 Canon 50mm EF f/1.4 USM
 Sigma 50mm f/1.4 Art DG
Chromatic aberration is probably more evident here than anywhere else in the picture. Even so, it's not obvious. The eye glint looks like a white disc with several faint colored discs slightly overlapping. Separating the channels, I found that in this area of the image, blues shifted lower-left, while reds shifted slightly upwards.
The animations below show this crop in each color channel.
Sigma 50mm f/1.4 Art DG
Chromatic aberration is probably more evident here than anywhere else in the picture. Even so, it's not obvious. The eye glint looks like a white disc with several faint colored discs slightly overlapping. Separating the channels, I found that in this area of the image, blues shifted lower-left, while reds shifted slightly upwards.
The animations below show this crop in each color channel.
 Canon 50mm EF f/1.4 USM
 Sigma 50mm f/1.4 Art DG
As you can see, the highlight shifts slightly more on the Canon shot, while the Sigma's highlight stays in place. There is a slight amount of chromatic aberration on the blue channel even with the Sigma, though.
Our next chromatic aberration test is on the edges of shapes. As we mentioned earlier, this will be less noticeable on a portrait. This is because the edges of a face will blur more at a larger aperture. Meanwhile, chromatic aberration is less pronounced at smaller apertures.
Sigma 50mm f/1.4 Art DG
As you can see, the highlight shifts slightly more on the Canon shot, while the Sigma's highlight stays in place. There is a slight amount of chromatic aberration on the blue channel even with the Sigma, though.
Our next chromatic aberration test is on the edges of shapes. As we mentioned earlier, this will be less noticeable on a portrait. This is because the edges of a face will blur more at a larger aperture. Meanwhile, chromatic aberration is less pronounced at smaller apertures.
 Canon 50mm EF f/1.4 USM
 Sigma 50mm f/1.4 Art DG
While a slight shift of the green channel is visible in this area of the Canon photo, it's relatively mild. Towards the edges of the picture, spherical aberration dwarfs the chromatic aberration effect, so it's harder to tell how pronounced it is.
Therefore, I don't think the difference in chromatic aberration will be a major problem for the majority of photo types. Only specific types of shots would highlight the difference here. For example, if you photographed a stark black-and-white polka dot pattern wide open, it may become noticeable.
After all these tests, we come back to the question: is the difference noticeable? Although I didn't notice much difference at first, after closer examination, it's somewhat obvious. However, keep in mind that these were shot at conditions where an aspherical lens element would make significant difference. At smaller aperture values, the differences between the lenses become less and less pronounced.
Overall, your best bet is to compare these lenses and their potential differences against your needs. Do you shoot at large apertures often, and are fine details and sharp edges all throughout the frame essential? If so, does this outweigh the big differences in price, weight, and size?
If you often travel with your camera, weight and size could be a major consideration. One lens is slightly over half a pound, the other is nearly two, the Canon at 290g and Sigma at 815g.
Sigma 50mm f/1.4 Art DG
While a slight shift of the green channel is visible in this area of the Canon photo, it's relatively mild. Towards the edges of the picture, spherical aberration dwarfs the chromatic aberration effect, so it's harder to tell how pronounced it is.
Therefore, I don't think the difference in chromatic aberration will be a major problem for the majority of photo types. Only specific types of shots would highlight the difference here. For example, if you photographed a stark black-and-white polka dot pattern wide open, it may become noticeable.
After all these tests, we come back to the question: is the difference noticeable? Although I didn't notice much difference at first, after closer examination, it's somewhat obvious. However, keep in mind that these were shot at conditions where an aspherical lens element would make significant difference. At smaller aperture values, the differences between the lenses become less and less pronounced.
Overall, your best bet is to compare these lenses and their potential differences against your needs. Do you shoot at large apertures often, and are fine details and sharp edges all throughout the frame essential? If so, does this outweigh the big differences in price, weight, and size?
If you often travel with your camera, weight and size could be a major consideration. One lens is slightly over half a pound, the other is nearly two, the Canon at 290g and Sigma at 815g.
 Note the difference in size of each lens' front element.
In terms of dimensions, the Canon is 2.9" x 2" dia. or 73.8mm x 50.5mm dia. Meanwhile, the Sigma is 3.9" x 3.4" dia. or 99.9mm x 85.4mm dia. This means that the Canon lens takes three-quarters of the volume in your camera bag. This doesn't include lens hoods. The Canon 50mm doesn't come with a lens hood, while the Sigma does. While hoods add bulk to your kit, they're a good idea if you're going traveling. Of course, lens flares can be quite trendy in photography nowadays when used consciously!
We tend to take the Canon lens on trips, but the Sigma is an excellent studio lens with crisp resolution of details.
Hopefully this article, though somewhat limited in scope, was helpful to you!
If you found it useful, you can find my other articles on photography and design
Note the difference in size of each lens' front element.
In terms of dimensions, the Canon is 2.9" x 2" dia. or 73.8mm x 50.5mm dia. Meanwhile, the Sigma is 3.9" x 3.4" dia. or 99.9mm x 85.4mm dia. This means that the Canon lens takes three-quarters of the volume in your camera bag. This doesn't include lens hoods. The Canon 50mm doesn't come with a lens hood, while the Sigma does. While hoods add bulk to your kit, they're a good idea if you're going traveling. Of course, lens flares can be quite trendy in photography nowadays when used consciously!
We tend to take the Canon lens on trips, but the Sigma is an excellent studio lens with crisp resolution of details.
Hopefully this article, though somewhat limited in scope, was helpful to you!
If you found it useful, you can find my other articles on photography and design 

 to export them. It's the fifth from the left in the upper left of the Markers panel, which I have pointed out with an arrow below. A dialog will come up, and there are a few options here.


 Buttons can jump to a Bookmark, whether it's on a different slide or the same one. Meanwhile, Overlays let you pause the video and show a lot of content on top of the video, if needed.
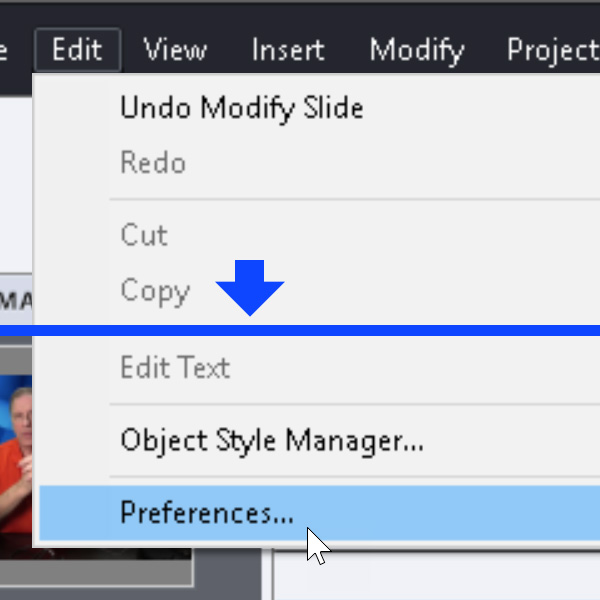

 These photos are exposed for the light with no attachments at 100% brightness. Therefore, light focusers like the Fresnel lens overexpose the image, and the softboxes underexpose them.